Label Waste
How to Reduce Label Waste and Consumable Costs in Your Print Operation
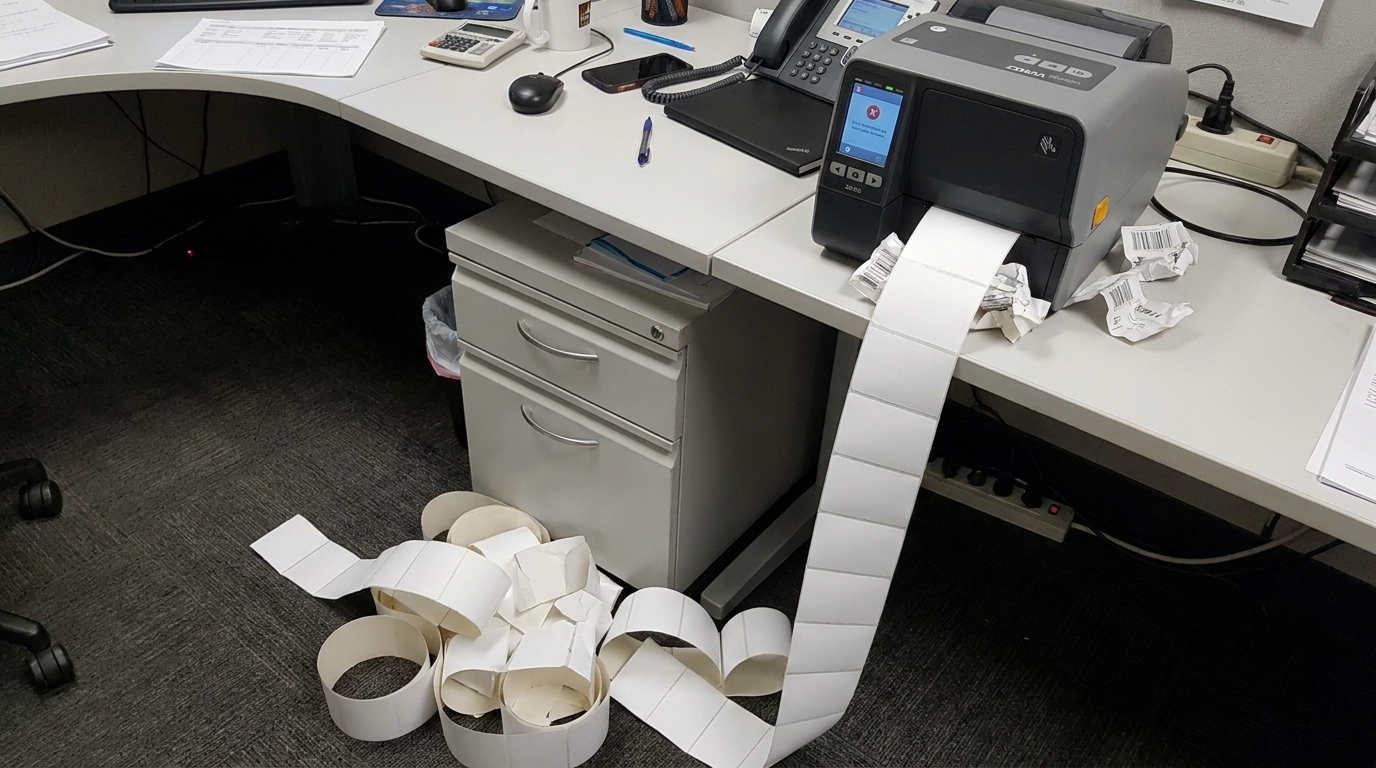
The Problem With Wasted Labels
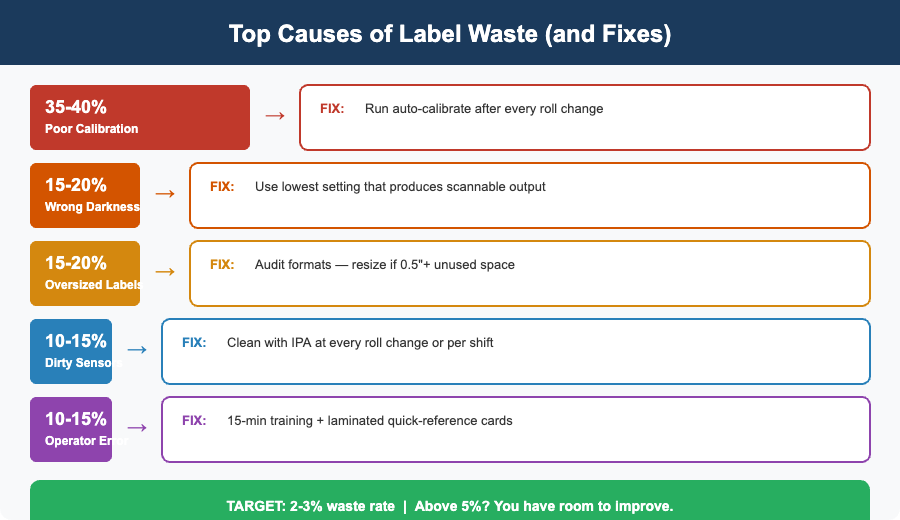
Label waste is one of those costs that nobody tracks until someone does the math. A roll of labels that should produce 1,000 usable prints and lose 50 to miscalibration at the start. Another 30 get thrown away because they were printed off-center. Ten more come out blank because the sensor missed a gap. Multiply that across 20 printers running three shifts, and you are burning through thousands of dollars in wasted media every month, plus the ribbon, printhead wear, and labor time that go with it. Reducing label waste is not complicated, but it does require attention to the right details. MIDCOM Data Technologies works with warehouse and manufacturing operations across the U.S. and Canada that have cut their consumable costs by 10-25% by addressing the most common sources of waste.
Calibration: The Single Biggest Lever
Poor calibration is responsible for more wasted labels than any other factor. When a thermal printer’s media sensor is not properly calibrated, it misjudges where one label ends and the next begins. The result is labels that print with the content shifted up or down, labels that feed right past the printhead without printing, or, worst case, a jam that wastes an entire section of the roll.
Gap Sensing vs. Black Mark Sensing
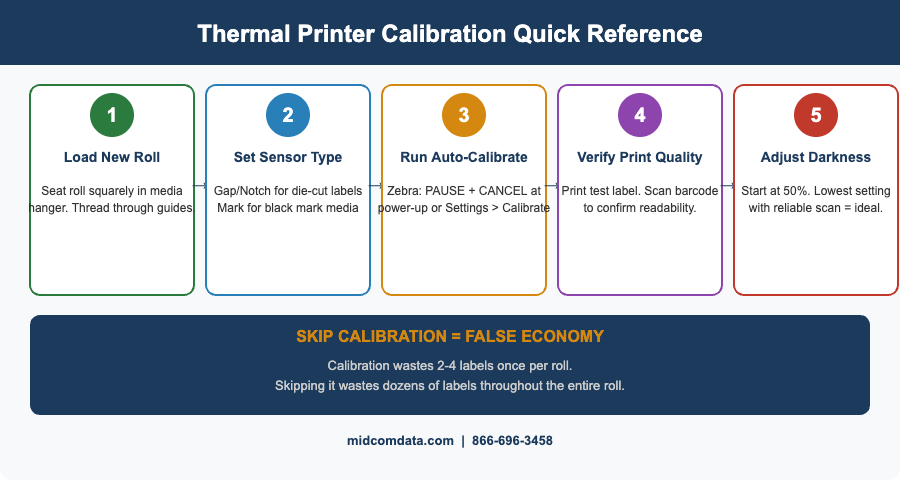
Most label stock uses either a gap between labels (die-cut labels with a liner) or a black mark on the back of the media (continuous stock or linerless labels) to tell the printer where each label starts. If your printer is set to gap sensing but your media uses black marks, or vice versa, the sensor cannot find the registration point and the printer will waste labels searching for it. Verify your sensor type setting every time you load a new media type. On Zebra printers, this is configured under the \”Media Type\” setting in the printer’s menu: \”Gap/Notch\” for die-cut labels with inter-label gaps, \”Continuous\” for uncut stock, or \”Mark\” for black mark media. A mismatch here is the most frequent cause of the \”my printer wastes the first five labels of every roll\” problem.
Running a Calibration Cycle
After loading a new roll, always run the printer’s auto-calibration routine. On Zebra ZT series printers, this is done by holding the PAUSE and CANCEL buttons simultaneously during power-up, or through the printer’s menu under \”Calibrate.\” The printer feeds several labels, reads the sensor values, and sets the correct thresholds for detecting the gap or mark. This takes about 30 seconds and typically wastes two to four labels, far fewer than the dozens you will waste if the sensor thresholds are off for the entire roll. Some operations skip calibration to avoid wasting those initial labels. This is false economy. A properly calibrated printer wastes two to four labels once per roll. An uncalibrated printer wastes a few labels at random intervals throughout the entire roll, adding up to far more.
Media Selection: Right Size, Right Material
Using oversized labels for your content is the simplest form of waste, and it is surprisingly common. A 4×6 label is the standard for shipping, but if your actual content (barcode, address block, return label) fits on a 4×4, every label uses 33% more material than necessary. At 2,000 labels per day, downsizing from 4×6 to 4×4 saves roughly 650 feet of label stock per day. Over a year, that is a meaningful reduction in both cost and roll-change frequency.
Audit Your Label Formats
Pull a sample of every label format your printers produce. Measure the actual content area — the barcodes, text, and graphics — and compare it to the label dimensions. If you have more than half an inch of unused space on any edge, that format is a candidate for resizing. Reformatting labels to a smaller die-cut size is a one-time effort that saves money on every print after that.
Direct Thermal vs. Thermal Transfer
Direct thermal labels are cheaper per unit because they do not require ribbon, but they fade when exposed to heat, light, and abrasion. If you are printing shipping labels that only need to last through transit, direct thermal is the right choice and the lower cost option. If you are printing asset tags, shelf labels, or anything that needs to remain readable for months or years, thermal transfer with a wax or wax-resin ribbon is necessary — and using direct thermal for long-life applications just creates waste when labels fade and need to be reprinted. Matching media type to application avoids both material waste and rework waste. MIDCOM’s consumables team can help you identify the right label stock and ribbon combination for each application in your operation.
Print Settings: Darkness, Speed, and Their Impact on Waste
The darkness (or heat) setting on your printer controls how much energy the printhead applies to the media. Too low, and barcodes are faint and fail scan verification. Too high, and you get smeared print, accelerated printhead wear, and labels that stick to the printhead and cause jams.
Finding the Right Darkness Setting
The ideal darkness setting is the lowest value that produces a scannable barcode with good edge definition. Start at the printer’s default setting (typically around 50% on Zebra printers), print a test label, and scan it with a verifier or your standard scanner. If it scans reliably, try reducing the darkness by one or two increments. If it fails, increase by one increment. The sweet spot is usually lower than most people set it. Operators tend to crank up the darkness because “darker looks better,” but this shortens printhead life by 20-40% and increases media sticking.
Print Speed Tradeoffs
Faster print speeds reduce the energy applied per dot, which can result in lighter print at the same darkness setting. If you increase print speed, you may need to bump the darkness up slightly to compensate. The key is to test and verify after any speed change rather than just eyeballing the output. A barcode that looks acceptable to the human eye may fail a scanner at the next station, and every failed scan means a reprint.
Operator Training: The Human Factor
Even perfectly calibrated printers with ideal settings waste labels when operators do not know how to load media correctly. The most common operator errors are loading the media path incorrectly (label stock threaded over instead of under a guide roller), not seating the roll squarely in the media hanger, and closing the printhead assembly without verifying alignment. A 15-minute training session per operator on proper media loading, sensor cleaning, and basic calibration can significantly reduce waste, especially at facilities with high employee turnover, where new hires learn the printer by trial and error. Create a laminated quick-reference card for each printer station showing the correct media path and the steps for running calibration. This costs almost nothing and eliminates the most common loading mistakes.
Sensor Maintenance: Keeping Detection Reliable
The media sensor is a small component with a big job. It reads either the gap between labels or the black mark on the media back to determine where each label starts. When this sensor gets coated with dust, adhesive residue, or paper fibers, its readings drift and the printer starts misjudging label positions. Clean the media sensor every time you change a roll or at minimum once per shift. Use a can of compressed air to blow debris out of the sensor channel, followed by a cotton swab with isopropyl alcohol if residue is visible. This takes under a minute and prevents the gradual accuracy drift that causes intermittent waste. The kind that is hard to notice in real time but adds up to hundreds of wasted labels per week.
Tracking Waste to Manage It
You cannot reduce what you do not measure. Start tracking label waste at the printer level: note how many labels are loaded (roll count) versus how many usable labels are produced (label count from your WMS or print server). The difference is your waste rate. A well-tuned operation runs at 2–3% waste. If you are above 5%, there is room to improve. Track waste by printer, not just in aggregate. One poorly calibrated or poorly maintained printer can skew the numbers for the entire fleet. Identifying the worst offenders and addressing them individually is faster and more effective than implementing fleet-wide changes.
Frequently Asked Questions
How much label waste is normal for thermal printers?
A well-calibrated and properly maintained thermal printer typically wastes 2–3% of label stock. This includes the few labels used during calibration at roll changes and occasional misprints. If your waste rate exceeds 5%, there is almost certainly a calibration, media selection, or maintenance issue that can be corrected.
Why does my thermal printer waste labels at the start of every roll?
The most common cause is skipping the auto-calibration routine after loading a new roll. Without calibration, the printer’s media sensor uses threshold values from the previous roll, which may not match the current label stock. Running a calibration cycle after every roll change wastes two to four labels upfront but prevents ongoing waste throughout the roll.
Does print darkness affect label waste?
Yes. Excessive darkness (heat) causes labels to stick to the printhead, leading to jams and wasted media. It also accelerates printhead wear, which eventually causes print quality problems that require reprinting. Setting the darkness to the lowest level that produces a reliably scannable barcode minimizes both direct media waste and premature printhead replacement.
How often should I clean my thermal printer’s media sensor?
Clean the media sensor at every roll change or at a minimum once per shift. Use compressed air to remove dust and debris, followed by a cotton swab with isopropyl alcohol if adhesive residue is visible. A dirty sensor causes gradual drift in label detection accuracy, leading to intermittent misprints that are easy to overlook but add up to significant waste.
Can switching label sizes really save money?
Absolutely. If your printed content fits on a smaller label, downsizing reduces material cost proportionally. Switching from a 4×6 label to a 4×4 label (when the content allows it) saves 33% on label stock per print. For an operation printing 2,000 labels per day, that translates to thousands of dollars in annual savings plus fewer roll changes, which reduces both labor time and calibration waste.
Start Cutting Waste Today
Most label waste comes from a handful of fixable issues: miscalibration, wrong media settings, excessive darkness, and infrequent sensor cleaning. Address these four areas and you will see results within the first week. For a deeper assessment of your print operation, including media selection, label format optimization, and preventive maintenance planning, contact MIDCOM Data Technologies at 866-696-3458. Our team can evaluate your setup and recommend specific changes that reduce waste and lower your consumable costs.
Contact MIDCOM Data Technologies at 866-696-3458.