
Error Codes
What This Error Means
The cutter blade is stuck in the media path, stopping the printer from advancing labels. On the ZM600, the wider 6.6" cutter module handles more material per cut, which makes adhesive buildup and debris jams more common than on narrower-format printers.
Common Causes
- Adhesive buildup on the cutter blade from wide- format label stock
- Label material or backing paper stuck in the cutter mechanism
- Worn or damaged cutter blade
How to Fix It
- 1 Turn off the printer and unplug the power cord.
- 2 Open the printhead assembly to access the cutter module.
- 3 Inspect the cutter blade and surrounding area for debris, torn labels, or adhesive buildup.
- 4 Clean the cutter blade with a cotton swab dampened with isopropyl alcohol. On the ZM600's wider blade, work from one edge to the other.
- 5 Remove any label material or backing paper caught in the mechanism.
- 6 Close the printhead, plug in the printer, and power on.
- 7 Run a test print to verify the cutter operates smoothly.
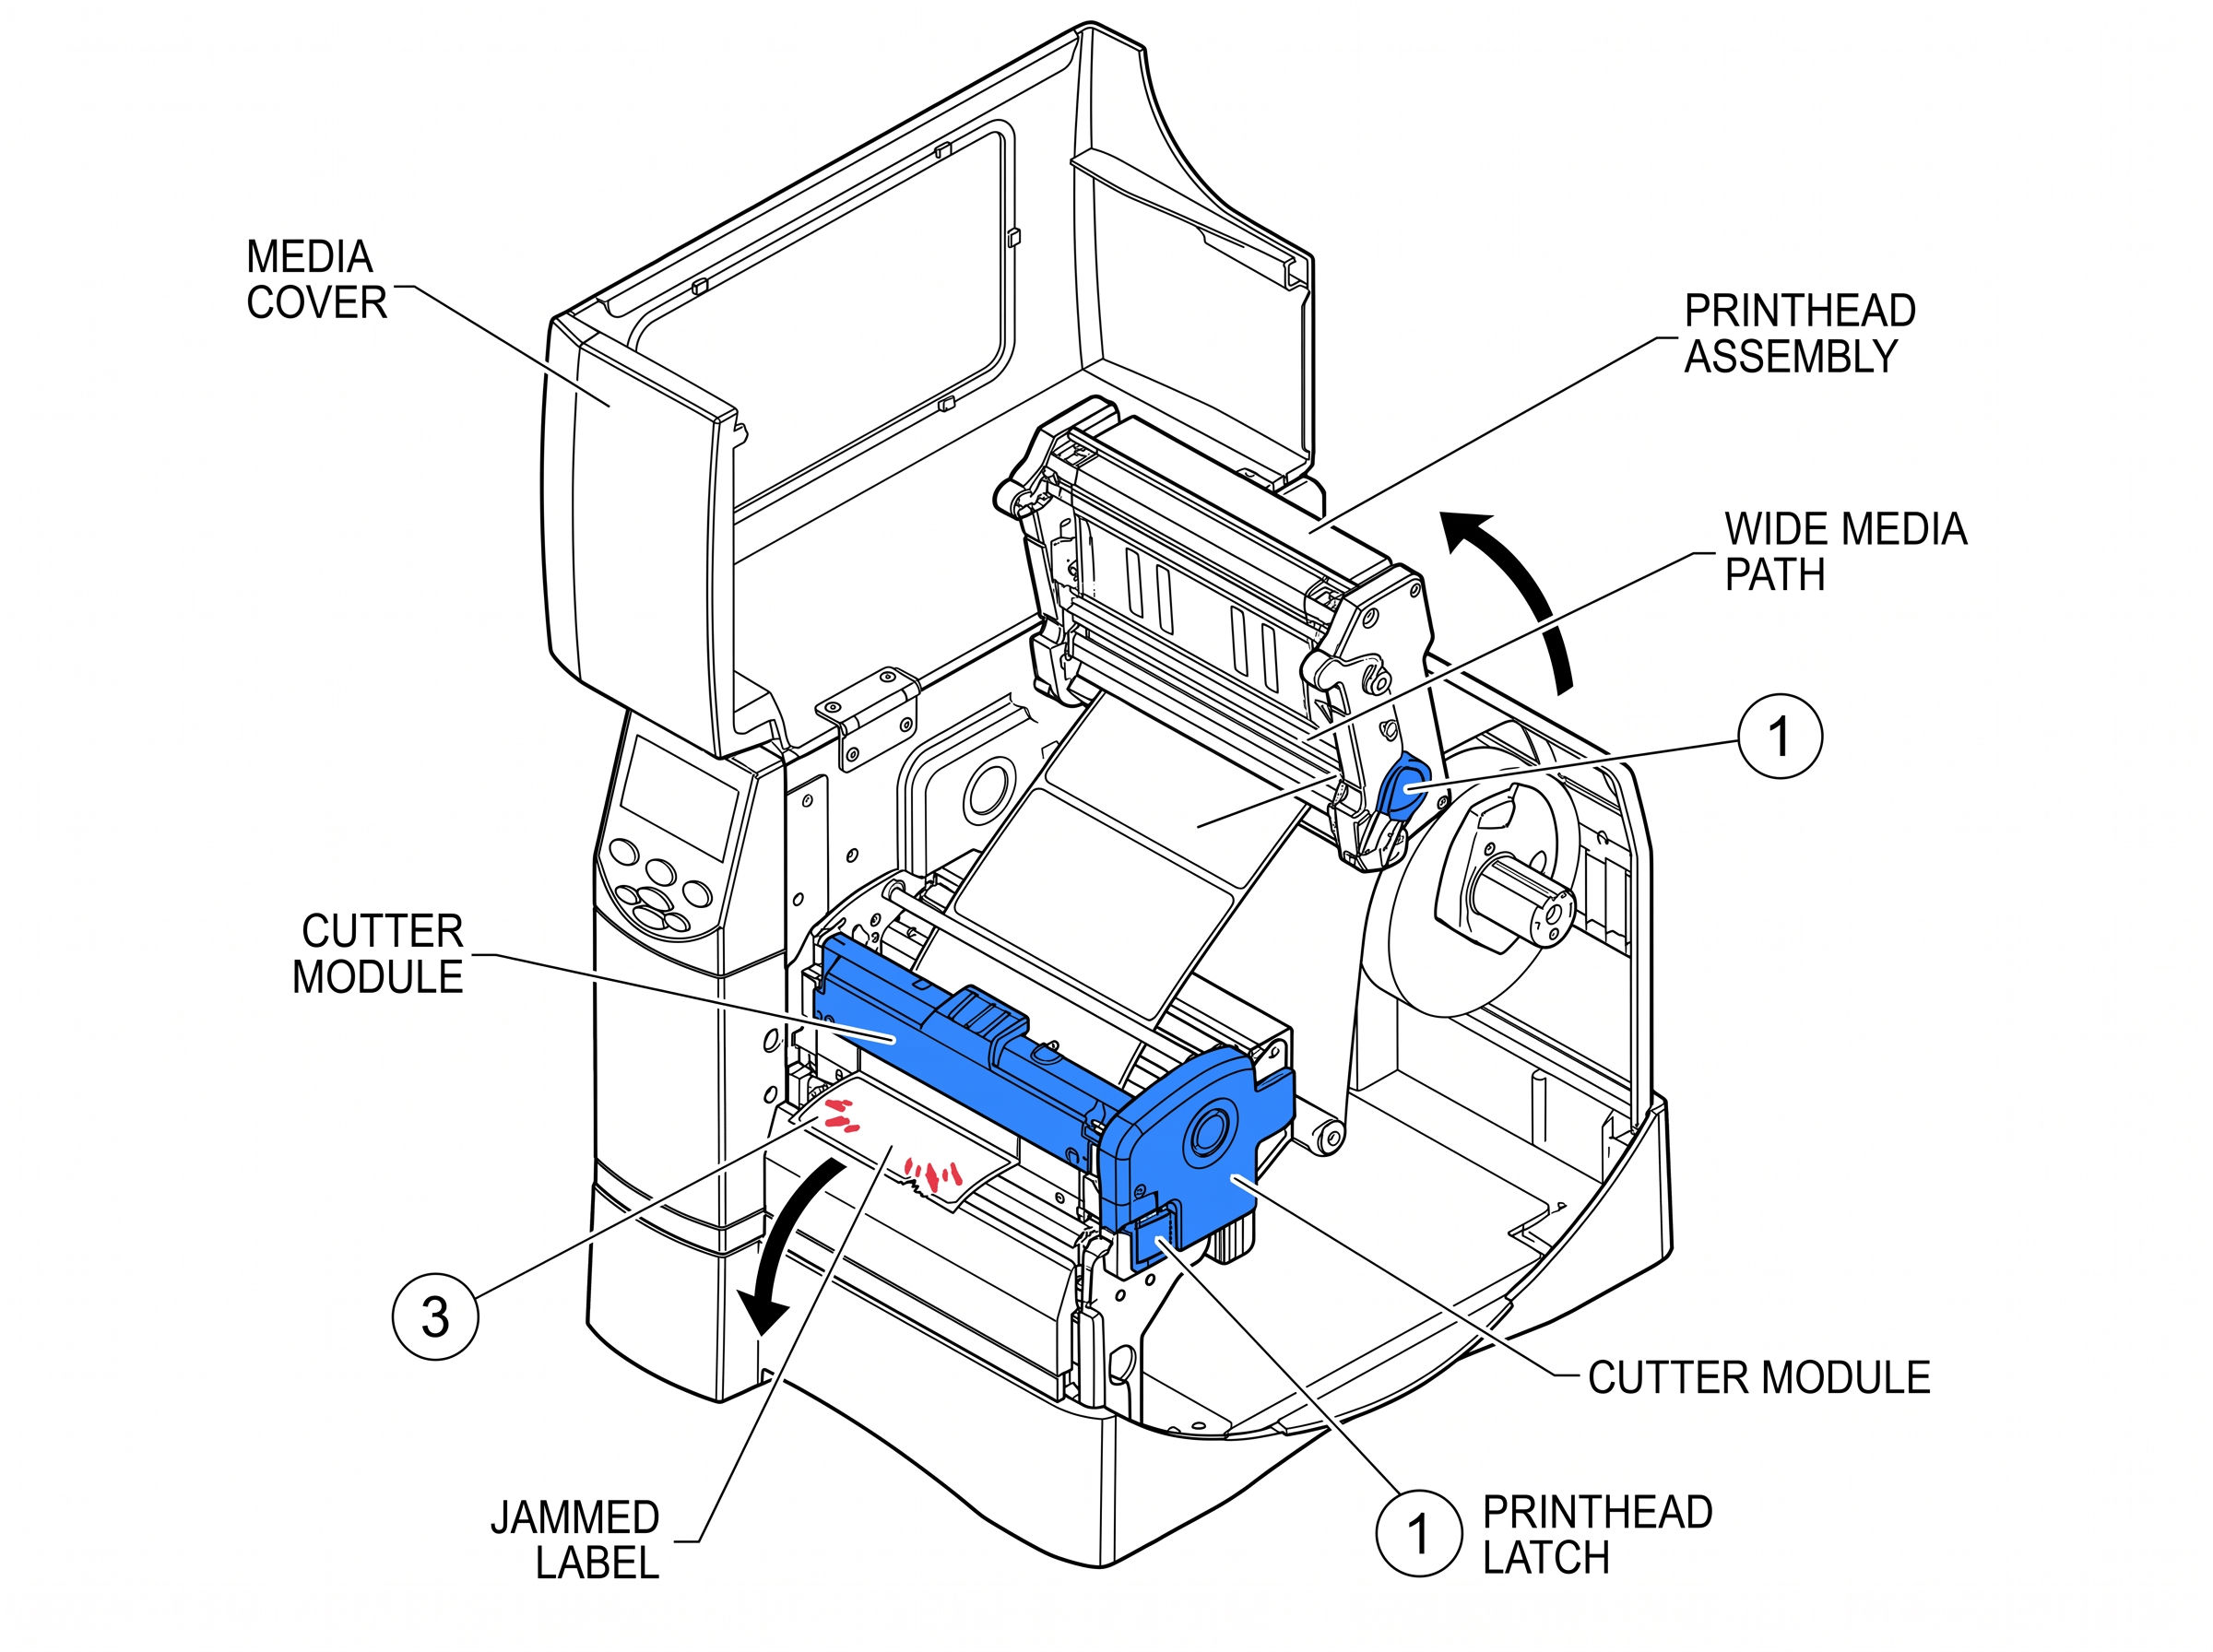 Fig 1. Cutter
The printer is reorganizing its internal flash memory (8MB on the ZM600). This is a normal maintenance process, but fre...
View fixWhat This Error Means
The printer is reorganizing its internal flash memory (8MB on the ZM600). This is a normal maintenance process, but frequent defragmentation indicates label formats are consuming excessive memory.
Common Causes
- Label formats that repeatedly write to and erase flash memory
- Poorly coded ZPL label formats using ^DF (download format) on every print job
- Large graphics stored for wide-format labels consuming disproportionate memory
How to Fix It
- 1 Allow the printer to finish the defragmentation process completely.
- 2 Once finished, print a configuration label (hold FEED for 2 seconds) and check the "Bytes Free" value.
- 3 If memory is low, use ^ID to delete unused stored formats and graphics.
- 4 Review your ZPL code — replace ^DF commands with ^XA...^XZ that print without storing to flash.
- 5 Wide-format labels with embedded graphics eat memory fast. Compress graphics or use scalable fonts instead of bitmaps.
- 6 If frequent defragmentation continues, consider the optional 64MB CompactFlash memory upgrade.
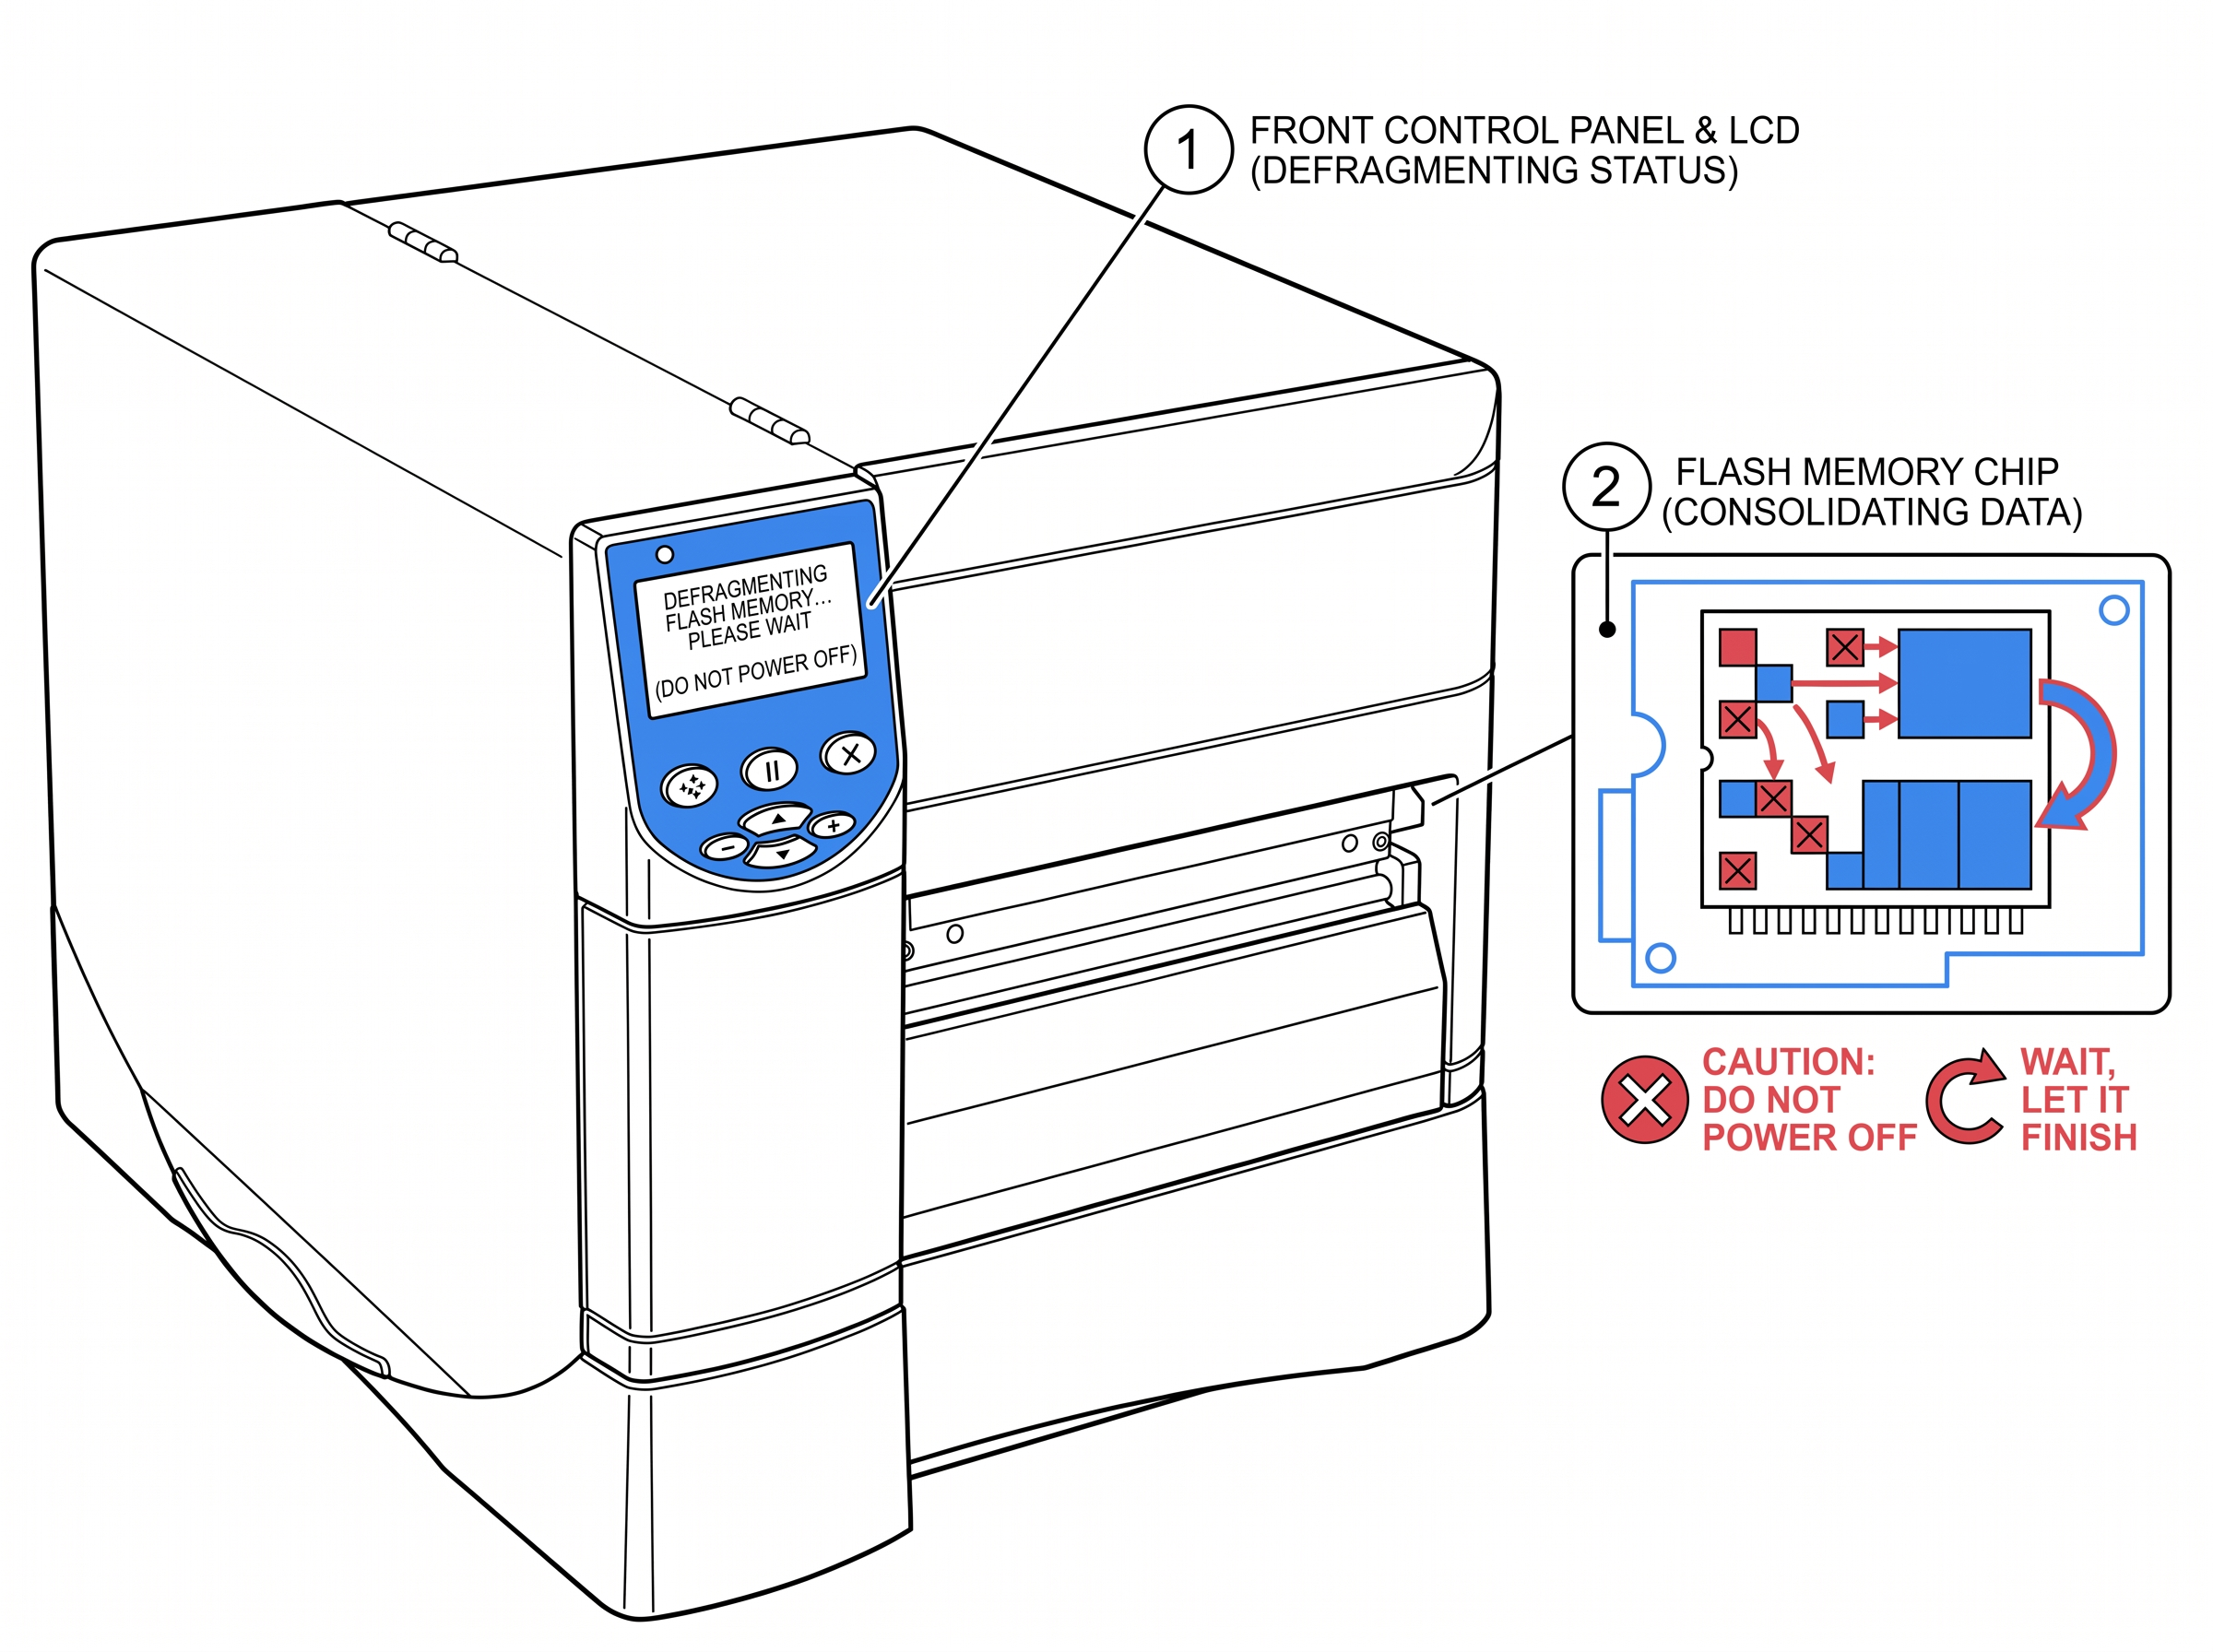 Fig 2. Defragmenting
The printer has detected that one or more heating elements on the printhead have failed. The ZM600's wider printhead co...
View fixWhat This Error Means
The printer has detected that one or more heating elements on the printhead have failed. The ZM600's wider printhead contains more heating elements than narrower-format models. You'll see white vertical lines running through your printed labels.
Common Causes
- Normal printhead wear — elements degrade over millions of inches printed
- Abrasive label stock or contaminated ribbon accelerating wear
- Uneven printhead pressure — more common on wide-format printers where pressure balance is critical
How to Fix It
- 1 Print a configuration label and look for white vertical lines in the barcode area. Lines confirm failed elements.
- 2 Clean the printhead with a Zebra-approved cleaning pen or isopropyl alcohol on a cotton swab. Sometimes debris mimics a bad element.
- 3 If lines persist after cleaning, the printhead needs replacement. The ZM600 uses printhead part #79803M (203 dpi) or #79804M (300 dpi).
- 4 To continue printing temporarily, suppress this warning via the front panel: TOOLS > HEAD RESIST > select a value. Print quality will still be degraded.
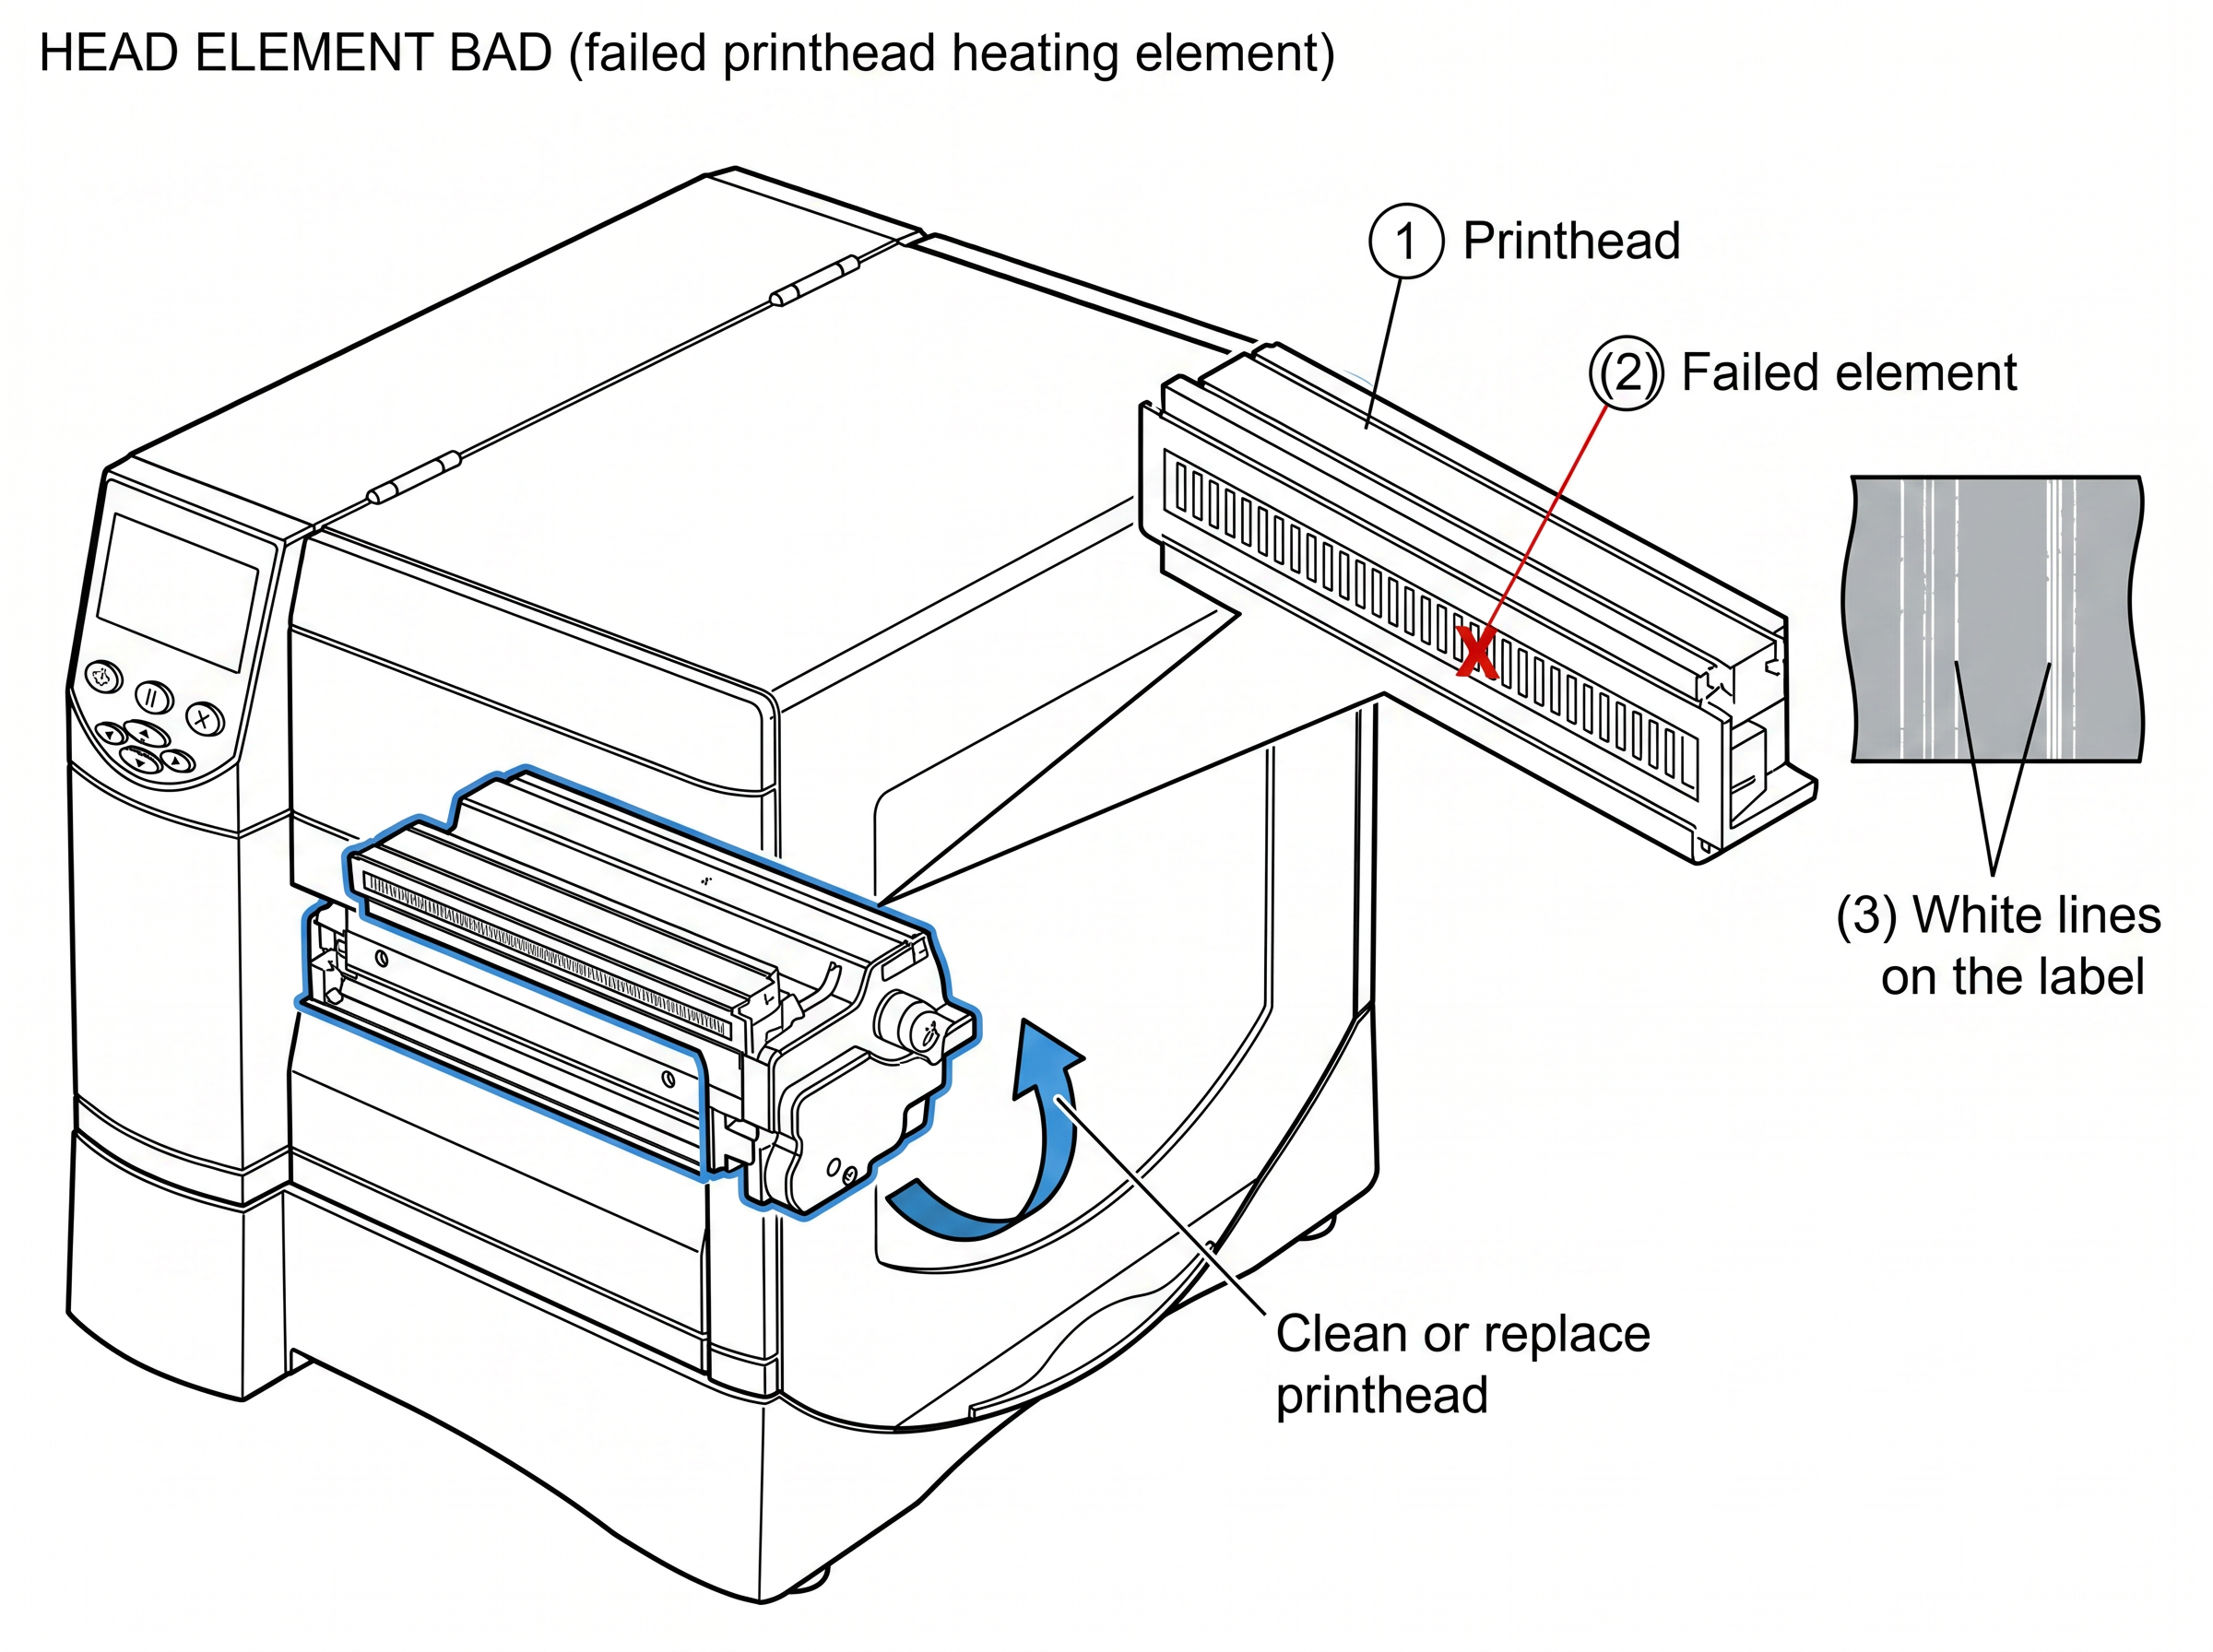 Fig 3. Head Element Bad
The printhead latch is not fully closed, or the printer thinks it isn't. The ZM600 uses a head-open sensor to prevent p...
View fixWhat This Error Means
The printhead latch is not fully closed, or the printer thinks it isn't. The ZM600 uses a head-open sensor to prevent printing when the printhead assembly isn't properly secured.
Common Causes
- Printhead not fully latched — the latch must click into place
- Wide-format media loaded incorrectly, preventing the head from closing flush
- Faulty head-open sensor or damaged sensor flag
How to Fix It
- 1 Open the printhead latch completely, then close it firmly until you hear it click.
- 2 If it won't latch, check that media and ribbon are routed correctly and not bunched up under the printhead.
- 3 Inspect the latch mechanism for damage or debris. Clean the area around the latch.
- 4 Check the small head-open sensor flag (a plastic tab near the printhead assembly). If bent or broken, it won't trigger the sensor correctly.
- 5 Power cycle the printer after re-latching.
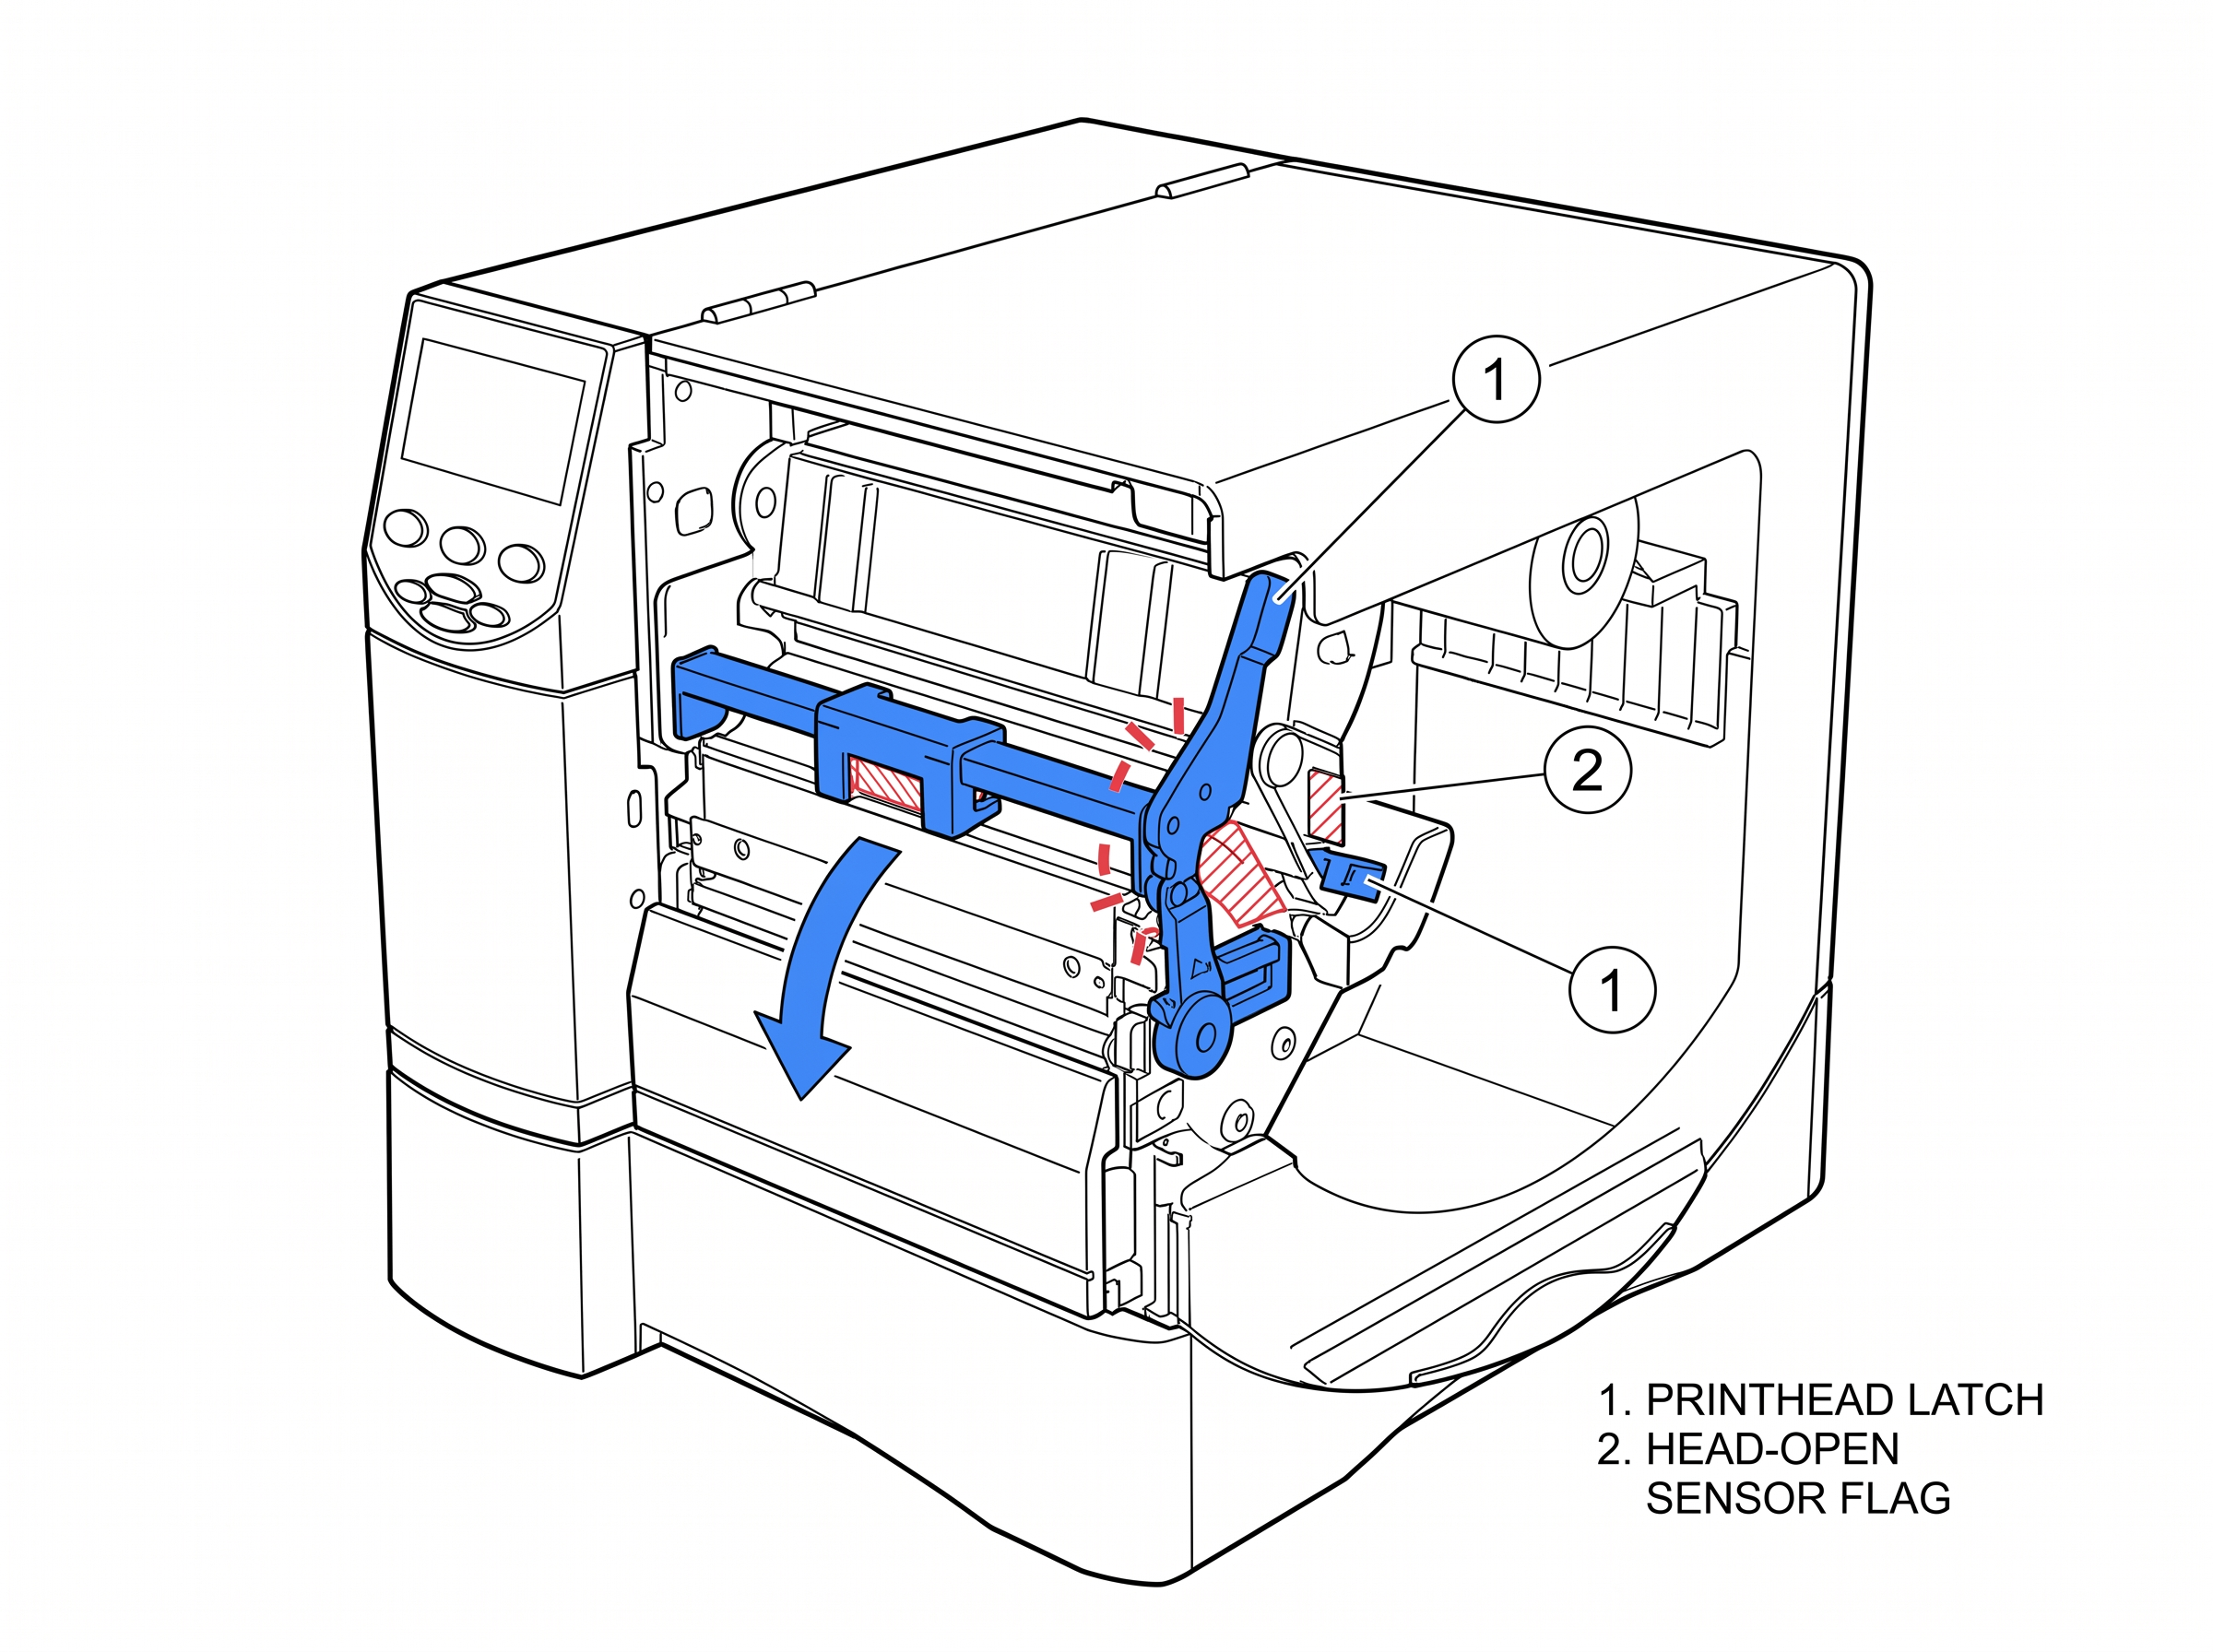 Fig 4. Head Open
The printer cannot communicate with the printhead or the installed printhead is not compatible with this model. This er...
View fixWhat This Error Means
The printer cannot communicate with the printhead or the installed printhead is not compatible with this model. This error most commonly appears after a printhead replacement.
Common Causes
- Wrong printhead installed — a ZM400 printhead (79800M/79801M) will not work in a ZM600
- Non-genuine Zebra printhead installed
- Printhead data cable not fully connected after a printhead swap
How to Fix It
- 1 Verify the printhead part number matches your ZM600's DPI: 79803M (203 dpi) or 79804M (300 dpi). Do not use ZM400 printheads.
- 2 Power off. Open the printhead and disconnect, then reconnect, the printhead data cable. Make sure the connector is fully seated.
- 3 Check the connector pins for corrosion or bent pins. Clean with isopropyl alcohol if needed.
- 4 Power on and check if the error clears.
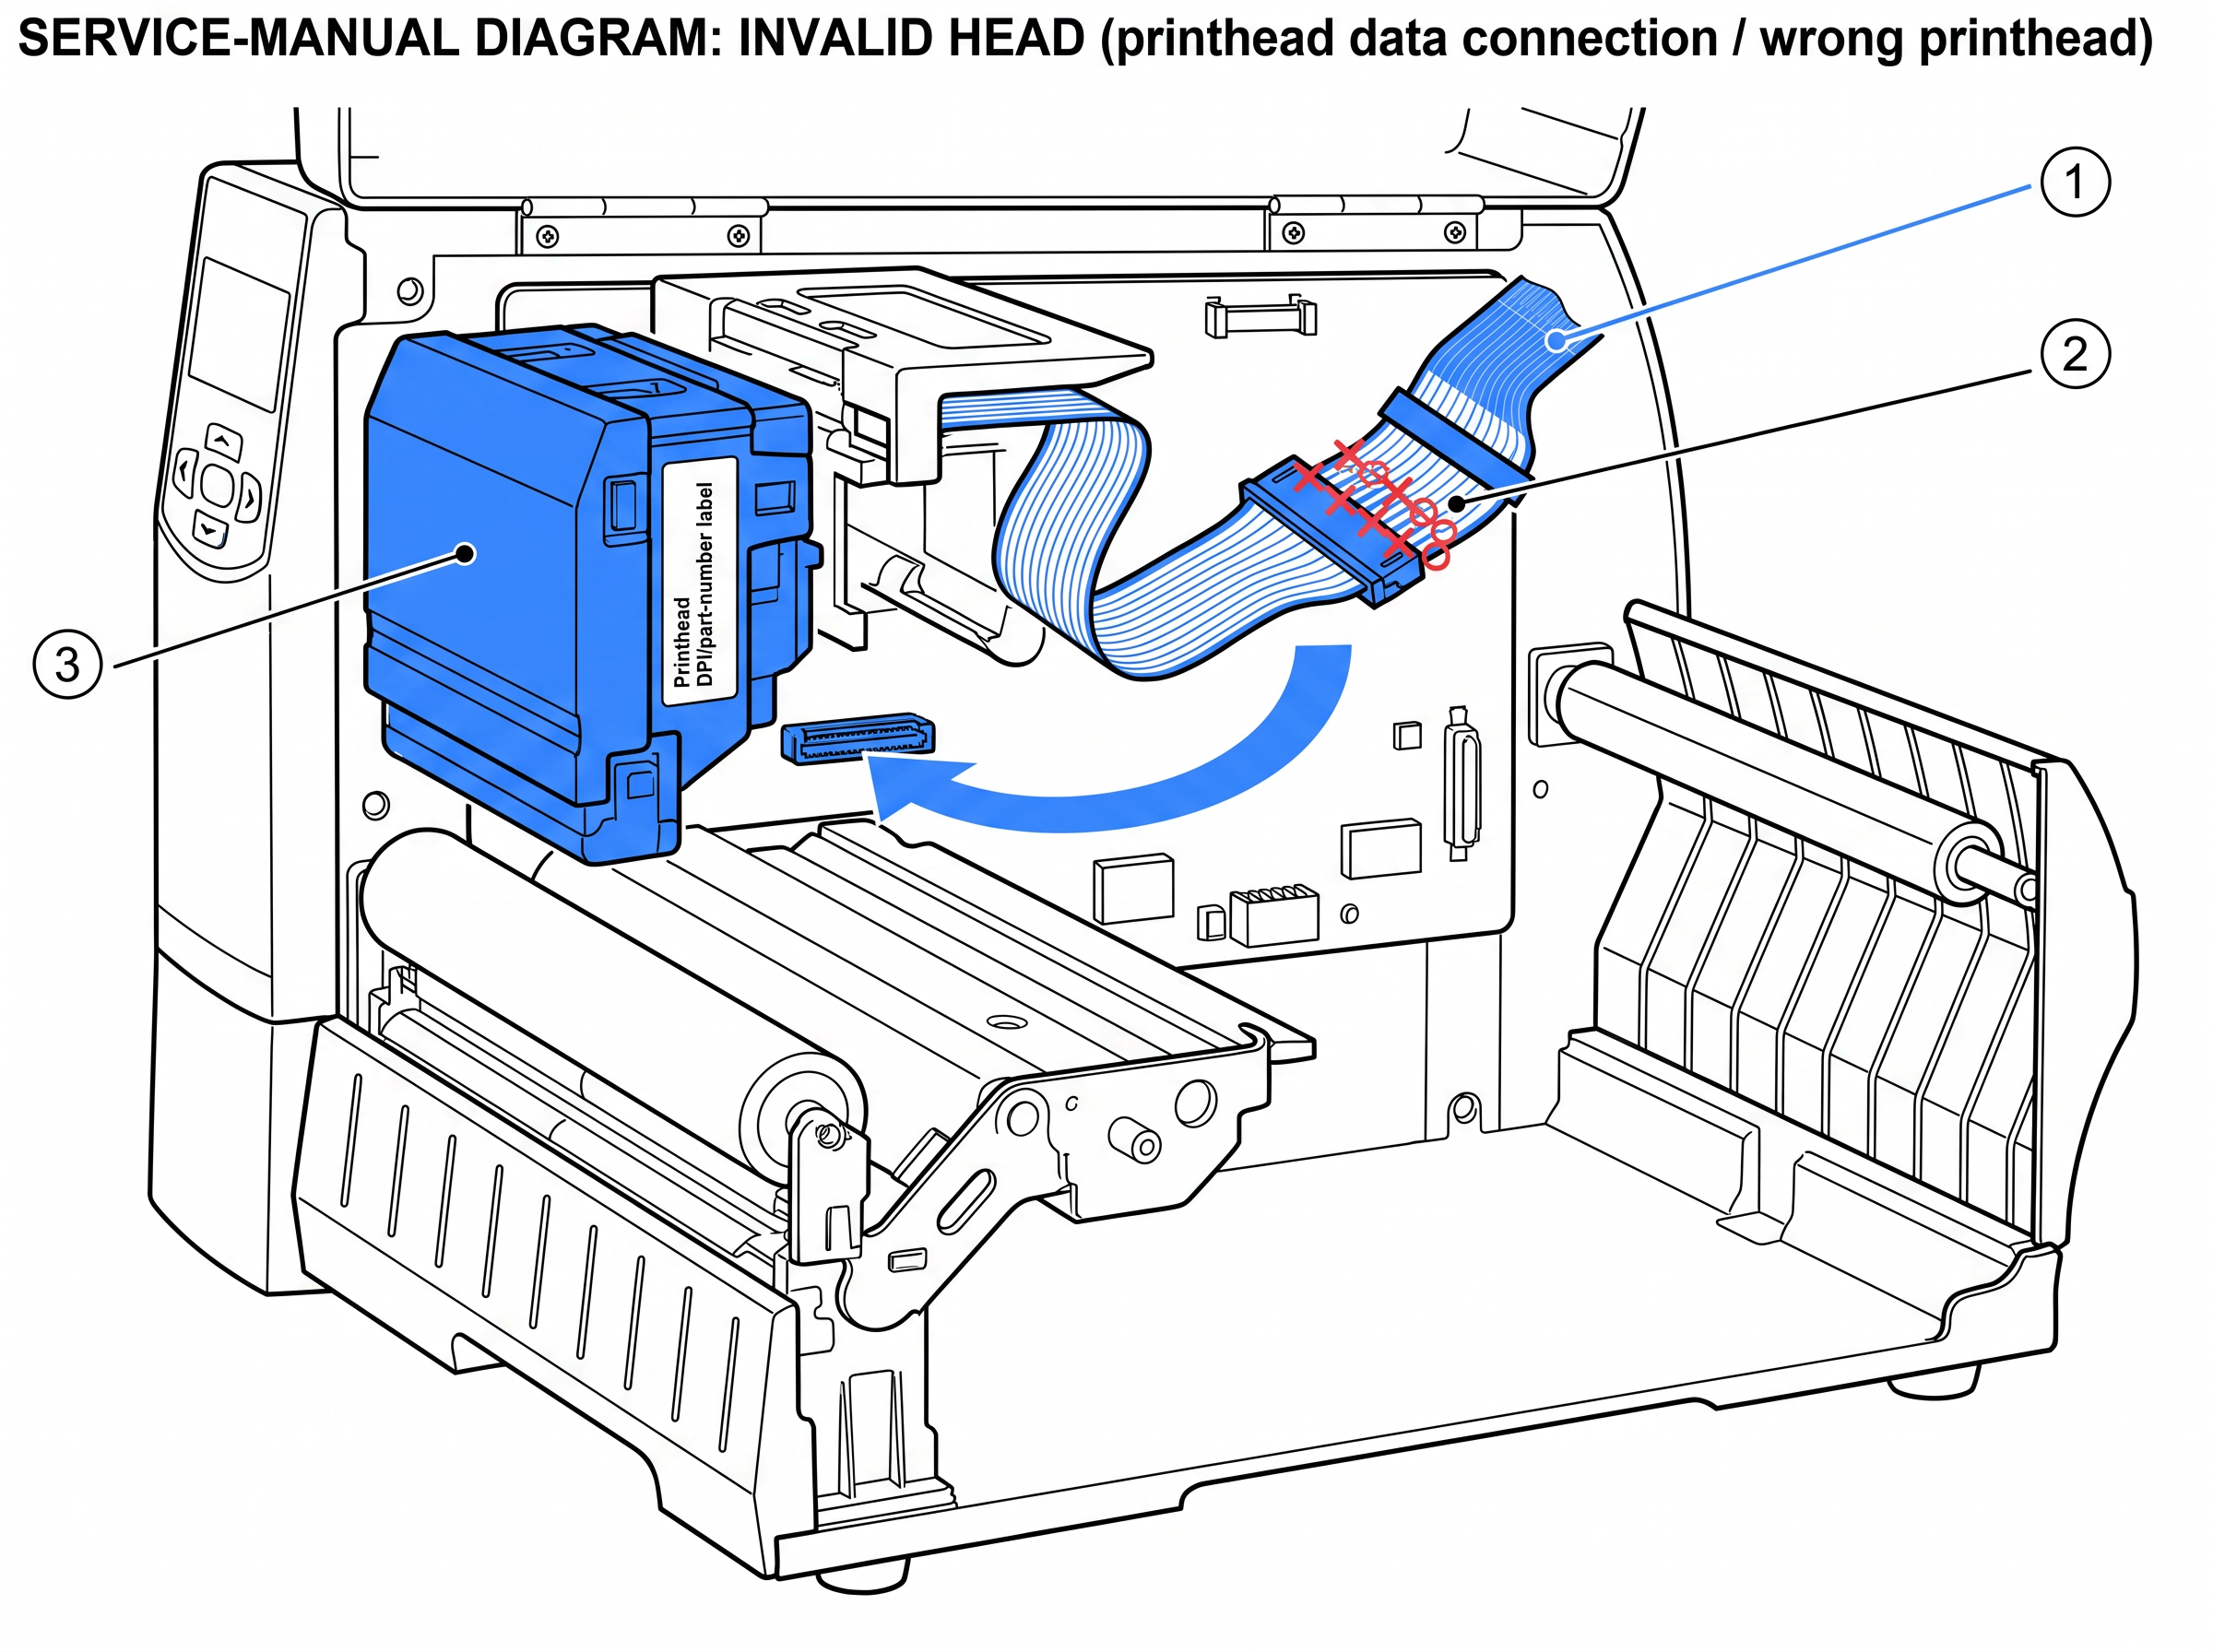 Fig 5. Invalid Head
The printer has run out of available memory to process your print job. The ZM600 ships with 16MB DRAM and 8MB flash — t...
View fixWhat This Error Means
The printer has run out of available memory to process your print job. The ZM600 ships with 16MB DRAM and 8MB flash — the same as the ZM400 — but the wider 6.6" print width means label images consume significantly more memory per label.
Common Causes
- Wide-format labels with large embedded graphics or bitmapped fonts
- Too many stored formats, fonts, or graphics in flash memory
- Print width set to the full 6.6" default when actual labels are narrower
How to Fix It
- 1 Run ^WD via ZPL to see what's stored in memory and how much space each object uses.
- 2 Delete unused formats and graphics with ^ID (e.g., ^IDR:*.GRF deletes all stored graphics).
- 3 Set print width to match your actual label width using ^PW. If you're printing 5" labels, don't leave it at the 6.6" maximum.
- 4 Optimize label formats: use scalable fonts instead of bitmaps, compress graphics.
- 5 For consistently large label formats, install the optional 64MB CompactFlash memory card.
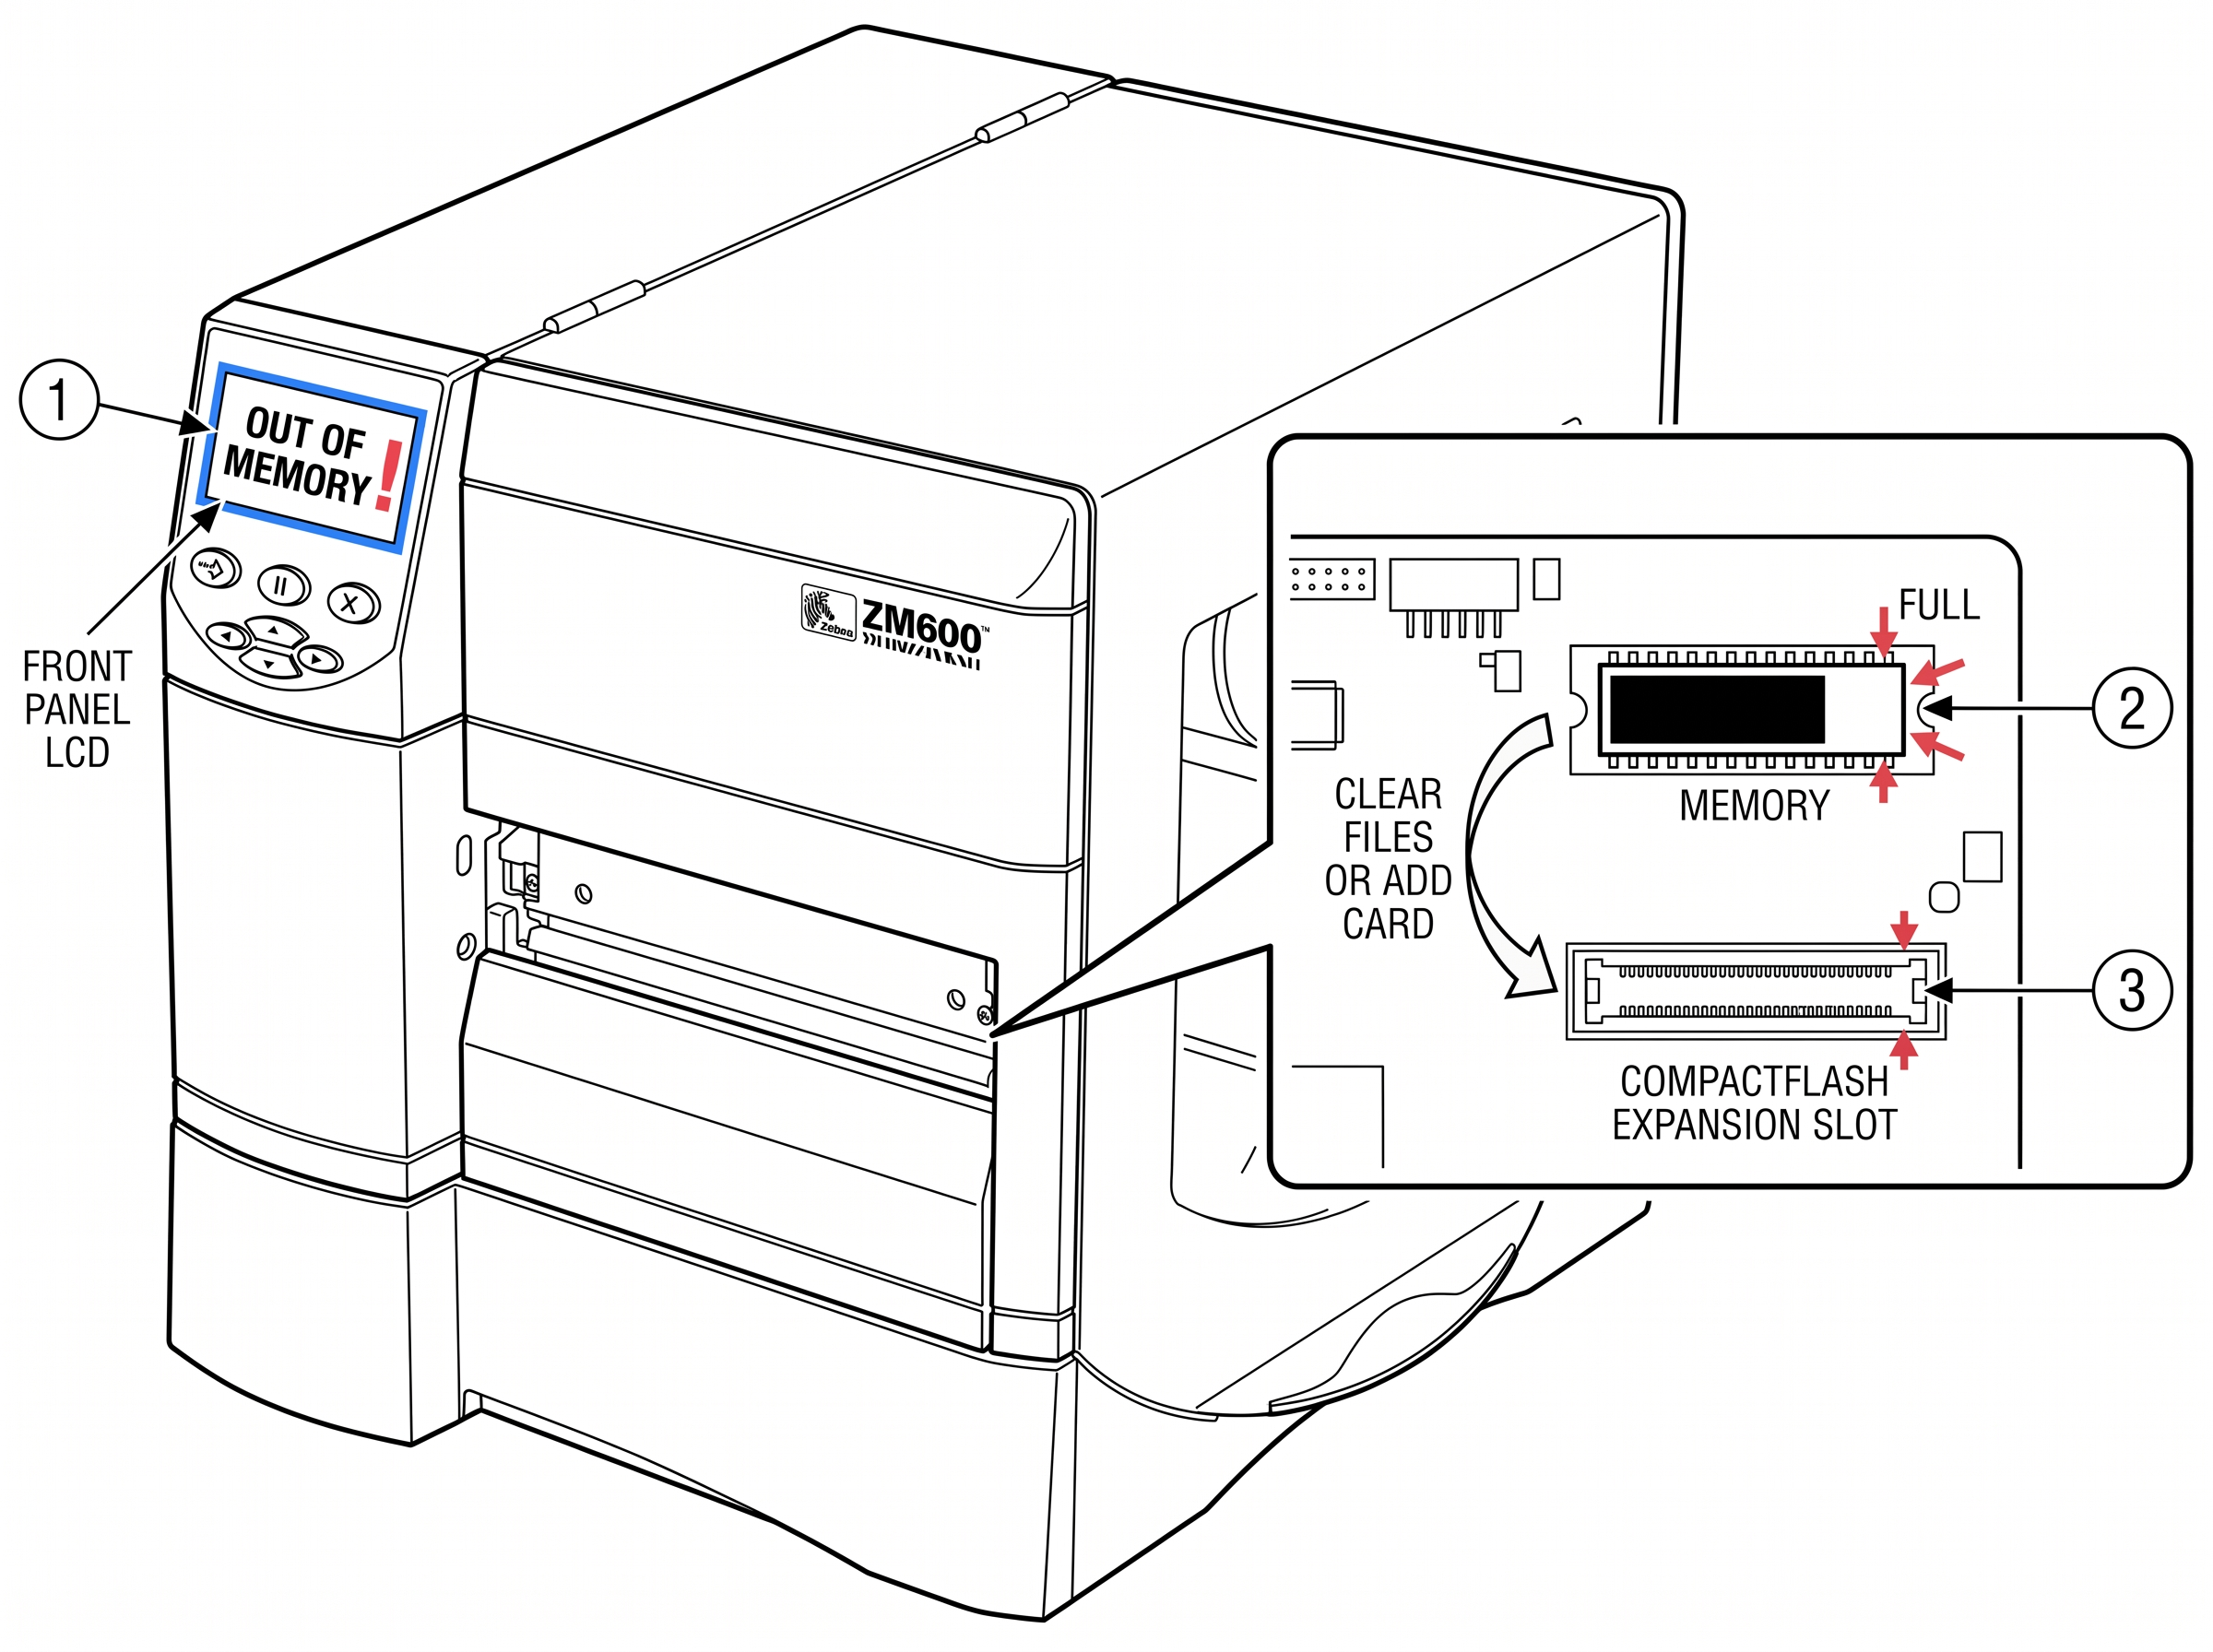 Fig 6. Out of Memory
The media sensor cannot detect labels in the media path. Despite the name, this error often occurs even when labels are...
View fixWhat This Error Means
The media sensor cannot detect labels in the media path. Despite the name, this error often occurs even when labels are loaded — it usually means the sensor can't distinguish between the label and the gap between labels.
Common Causes
- Media sensor is not calibrated for the current label stock
- Movable media sensor not positioned over the gap/mark — on the ZM600's wider media path, there's more room for misalignment
- Dirty media sensor — dust or adhesive residue blocking the sensor eye
How to Fix It
- 1 Open the printhead and verify that labels are loaded and routed correctly under the media guides and over the platen roller.
- 2 Check that the movable media sensor is positioned over the gap between labels. On the ZM600, the sensor has a wider range of travel — make sure it's actually aligned with your label gap.
- 3 Run auto-calibration: with the printhead closed, hold FEED + PAUSE simultaneously until the printer feeds several labels.
- 4 If using non-standard media, use manual calibration via TOOLS > SENSORS > MANUAL CALIBRATE.
- 5 Clean the media sensor with compressed air or a cotton swab to remove dust buildup.
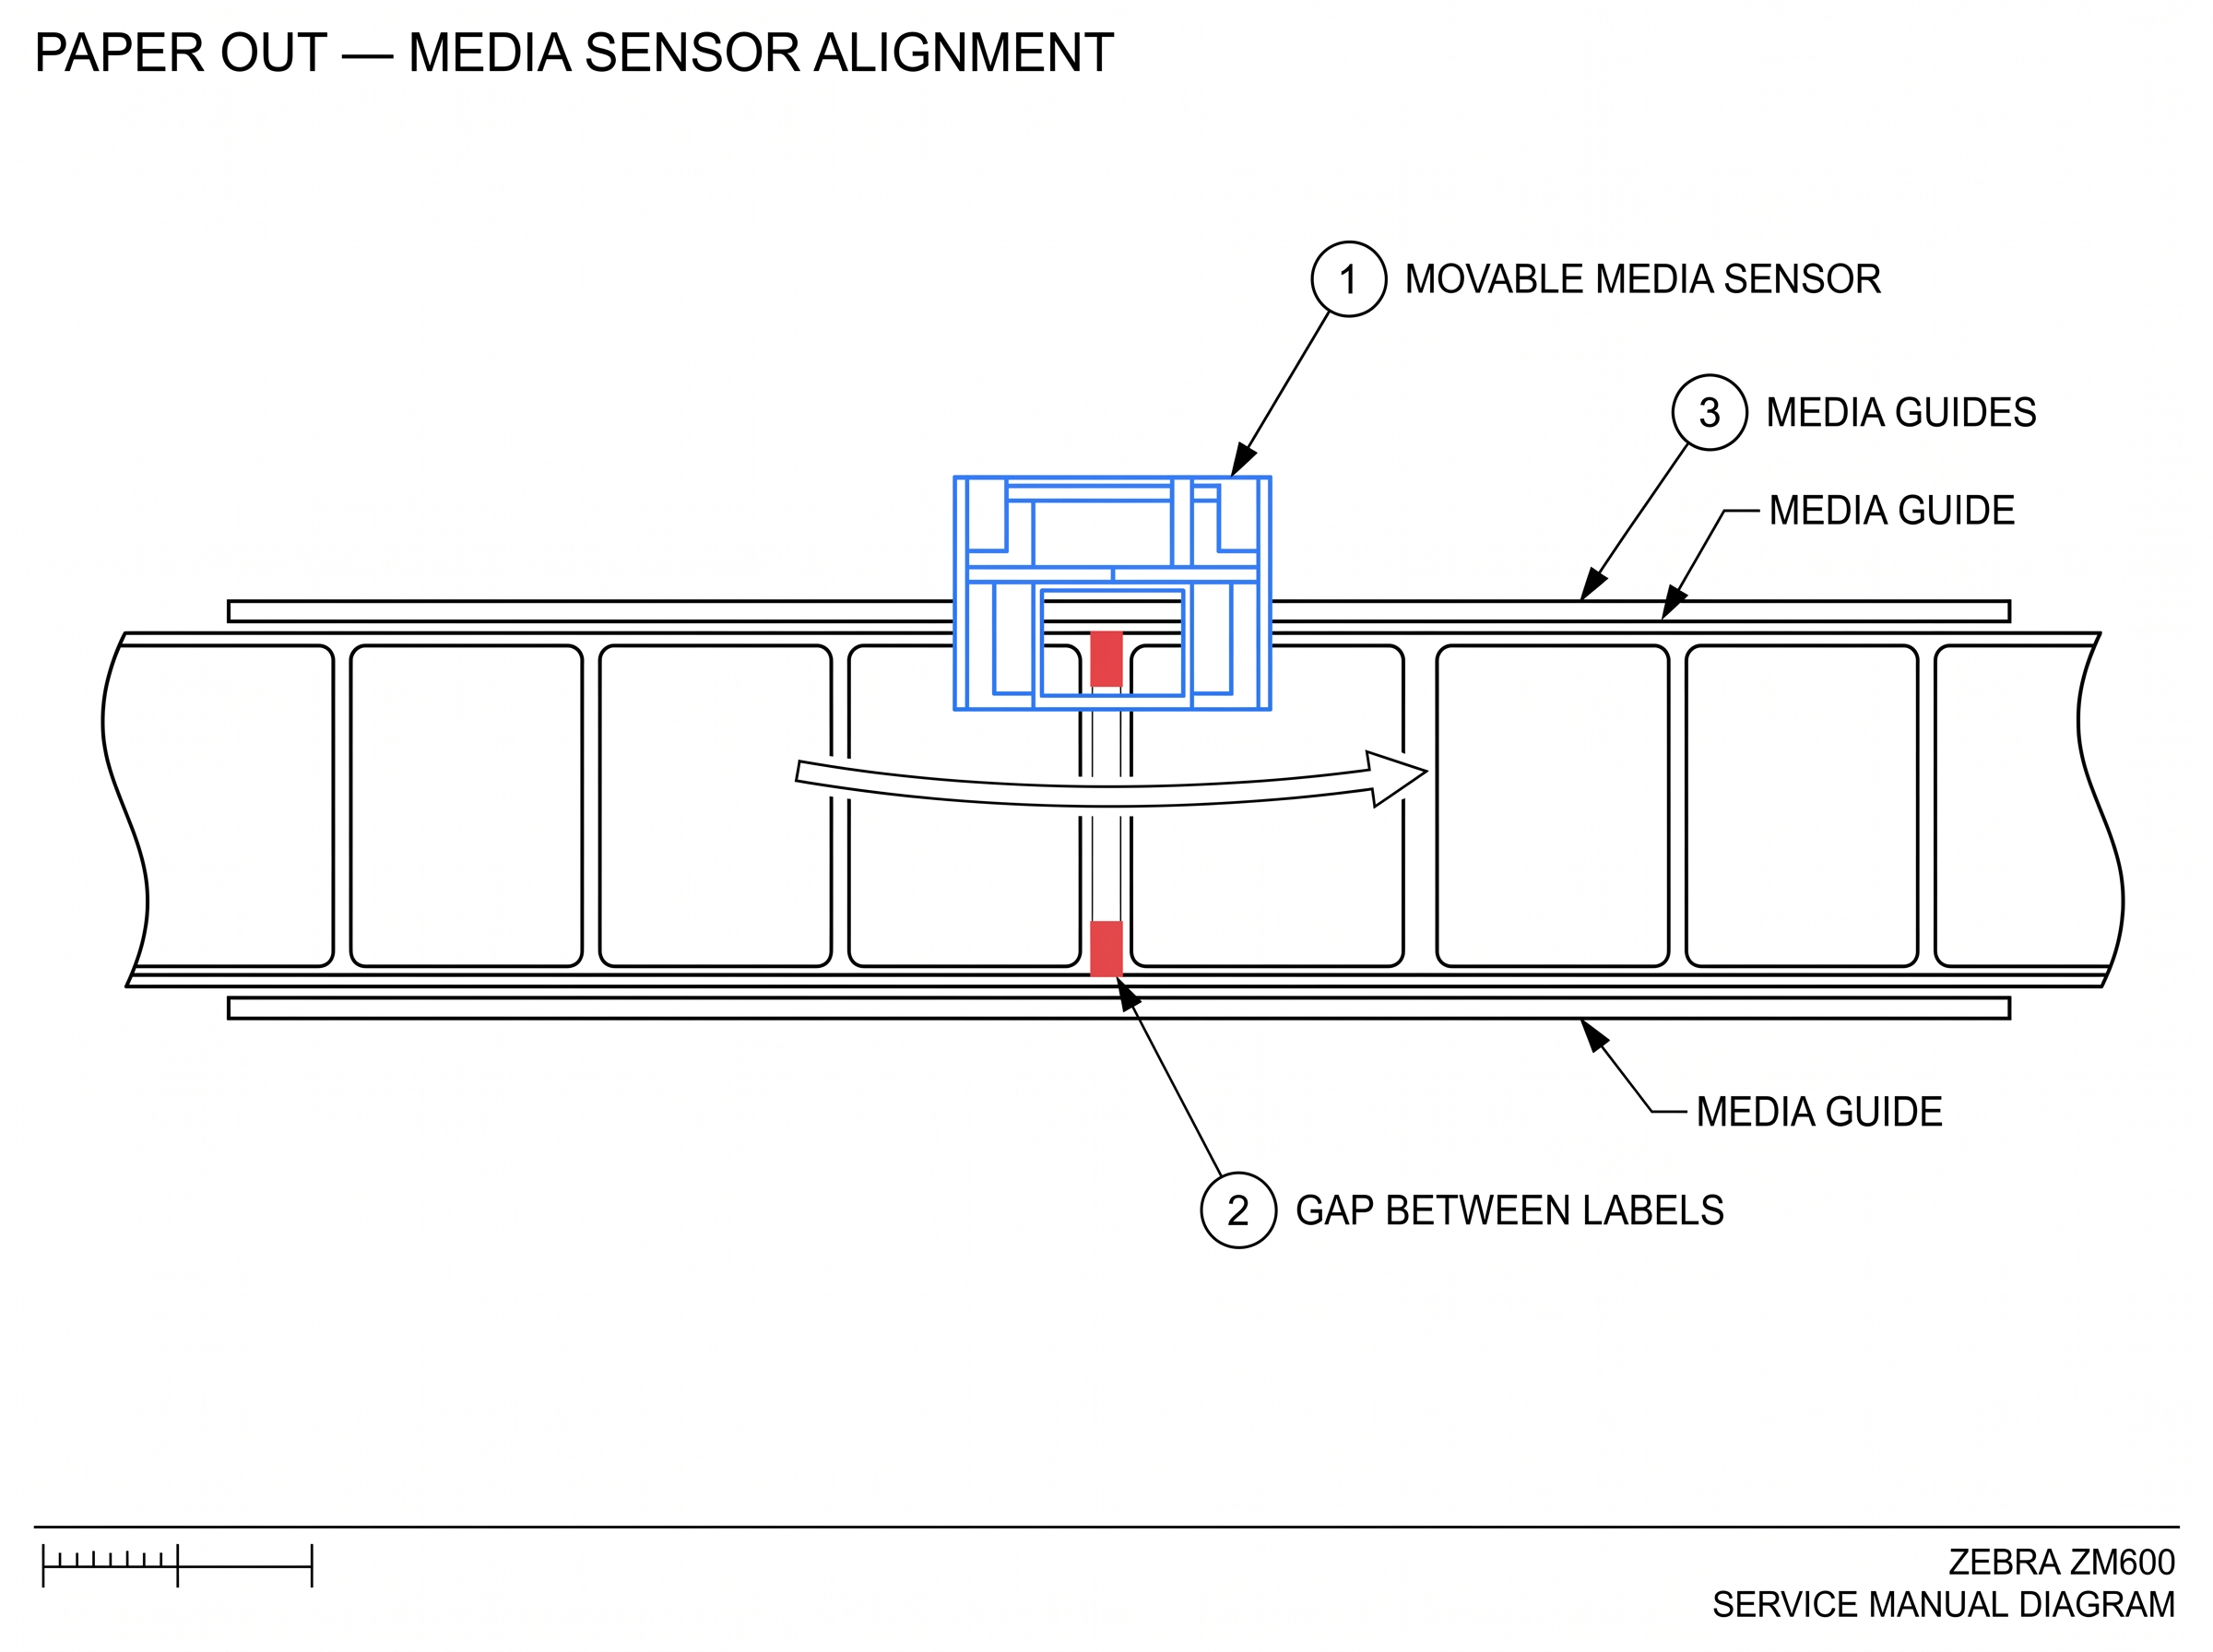 Fig 7. Paper Out
The printer is set to Thermal Transfer mode but cannot detect ribbon. Either the ribbon is missing, loaded incorrectly,...
View fixWhat This Error Means
The printer is set to Thermal Transfer mode but cannot detect ribbon. Either the ribbon is missing, loaded incorrectly, or the ribbon sensor can't see it.
Common Causes
- Ribbon roll is empty or not installed
- Ribbon loaded with the ink-coated side facing the wrong direction (ink side must face the label)
- Print mode set to "Thermal Transfer" when using direct thermal labels (no ribbon needed)
How to Fix It
- 1 If using direct thermal labels (no ribbon needed): go to SETUP > PRINT MODE > select DIRECT THERMAL.
- 2 If using thermal transfer: verify the ribbon is loaded correctly. The ink side must face the label — do the sticky-note test.
- 3 Re-route the ribbon according to the loading diagram inside the printer cover. Ribbon must pass over the printhead and under the ribbon sensor.
- 4 If the sensor profile shows the RIBBON threshold line is too high, recalibrate sensors or load printer defaults.
- 5 If the ribbon roll is empty, replace it and close the printhead.
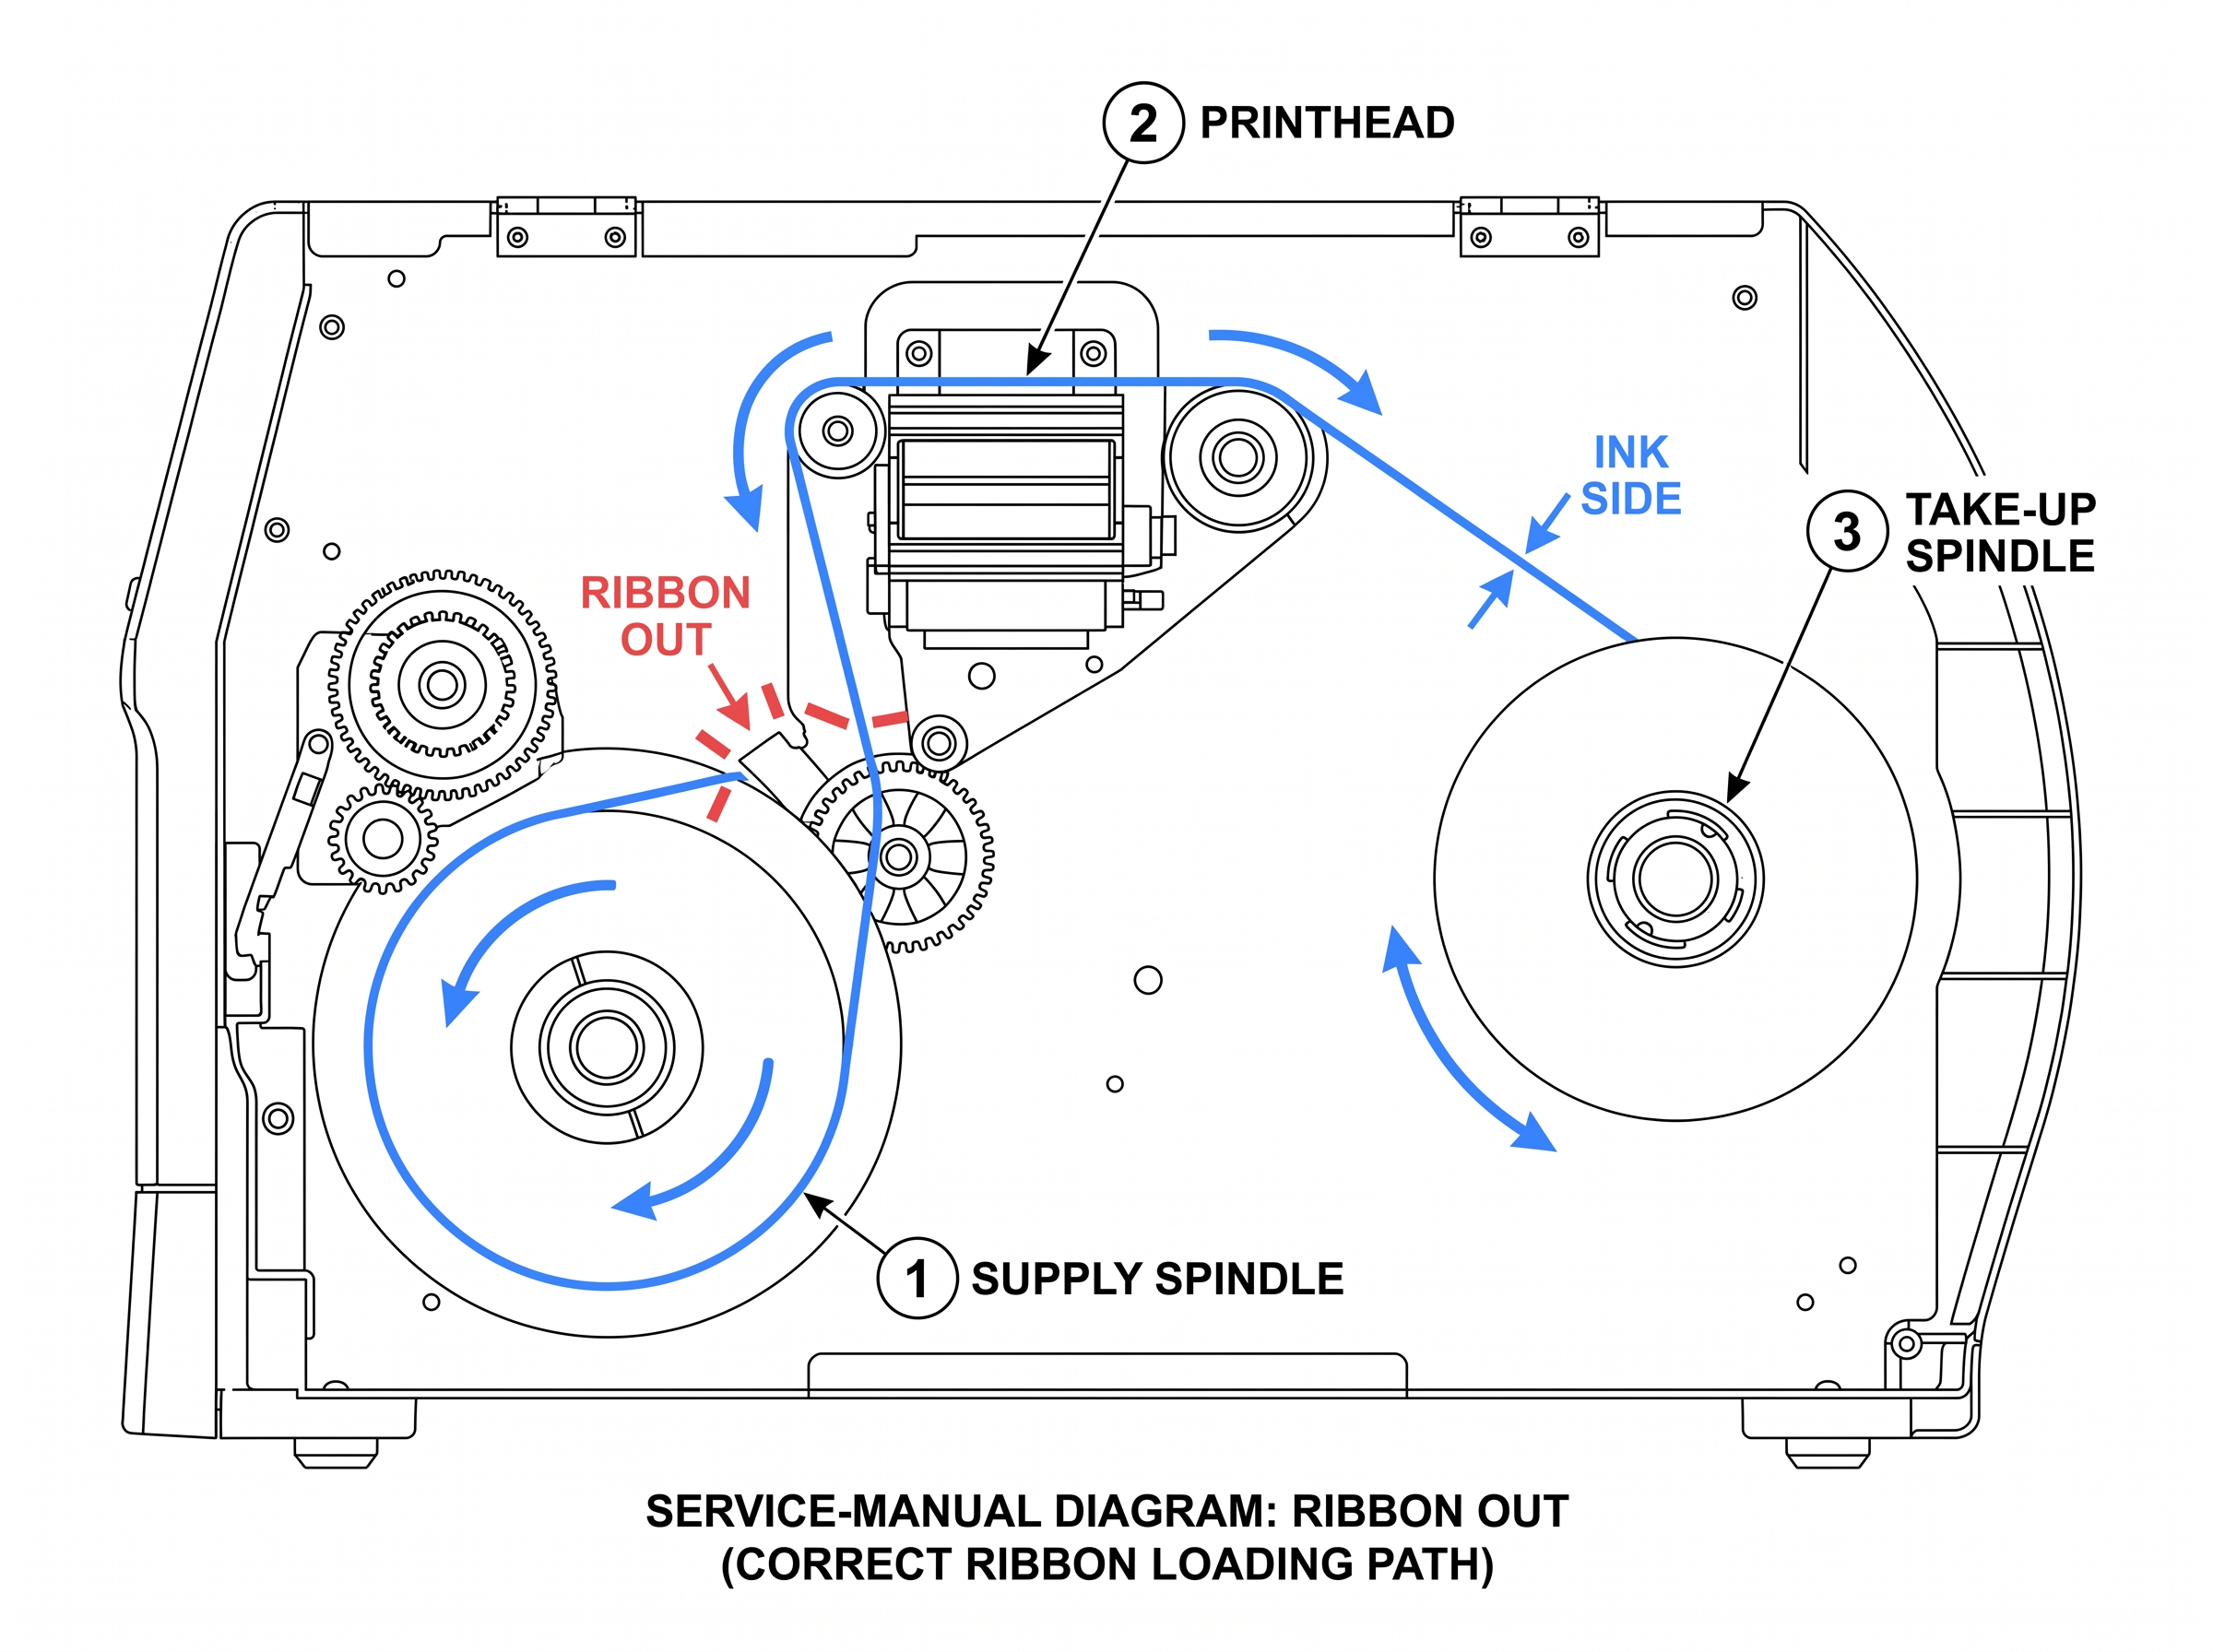 Fig 8. Ribbon Out
The printhead thermistor (temperature sensor) is not responding. The ZM600 uses the thermistor to monitor printhead tem...
View fixWhat This Error Means
The printhead thermistor (temperature sensor) is not responding. The ZM600 uses the thermistor to monitor printhead temperature and adjust heat output. Without it, the printer cannot safely control print quality.
Common Causes
- Loose or disconnected printhead data cable
- Damaged printhead thermistor (usually from physical impact or age)
- Corroded connector between the printhead and main logic board
How to Fix It
- 1 Power off the printer and unplug it.
- 2 Open the printhead assembly and disconnect the printhead data cable.
- 3 Inspect the cable connector for bent pins, corrosion, or debris. Clean with isopropyl alcohol.
- 4 Reconnect the data cable firmly — it should click or seat snugly.
- 5 Power on and check if the error clears.
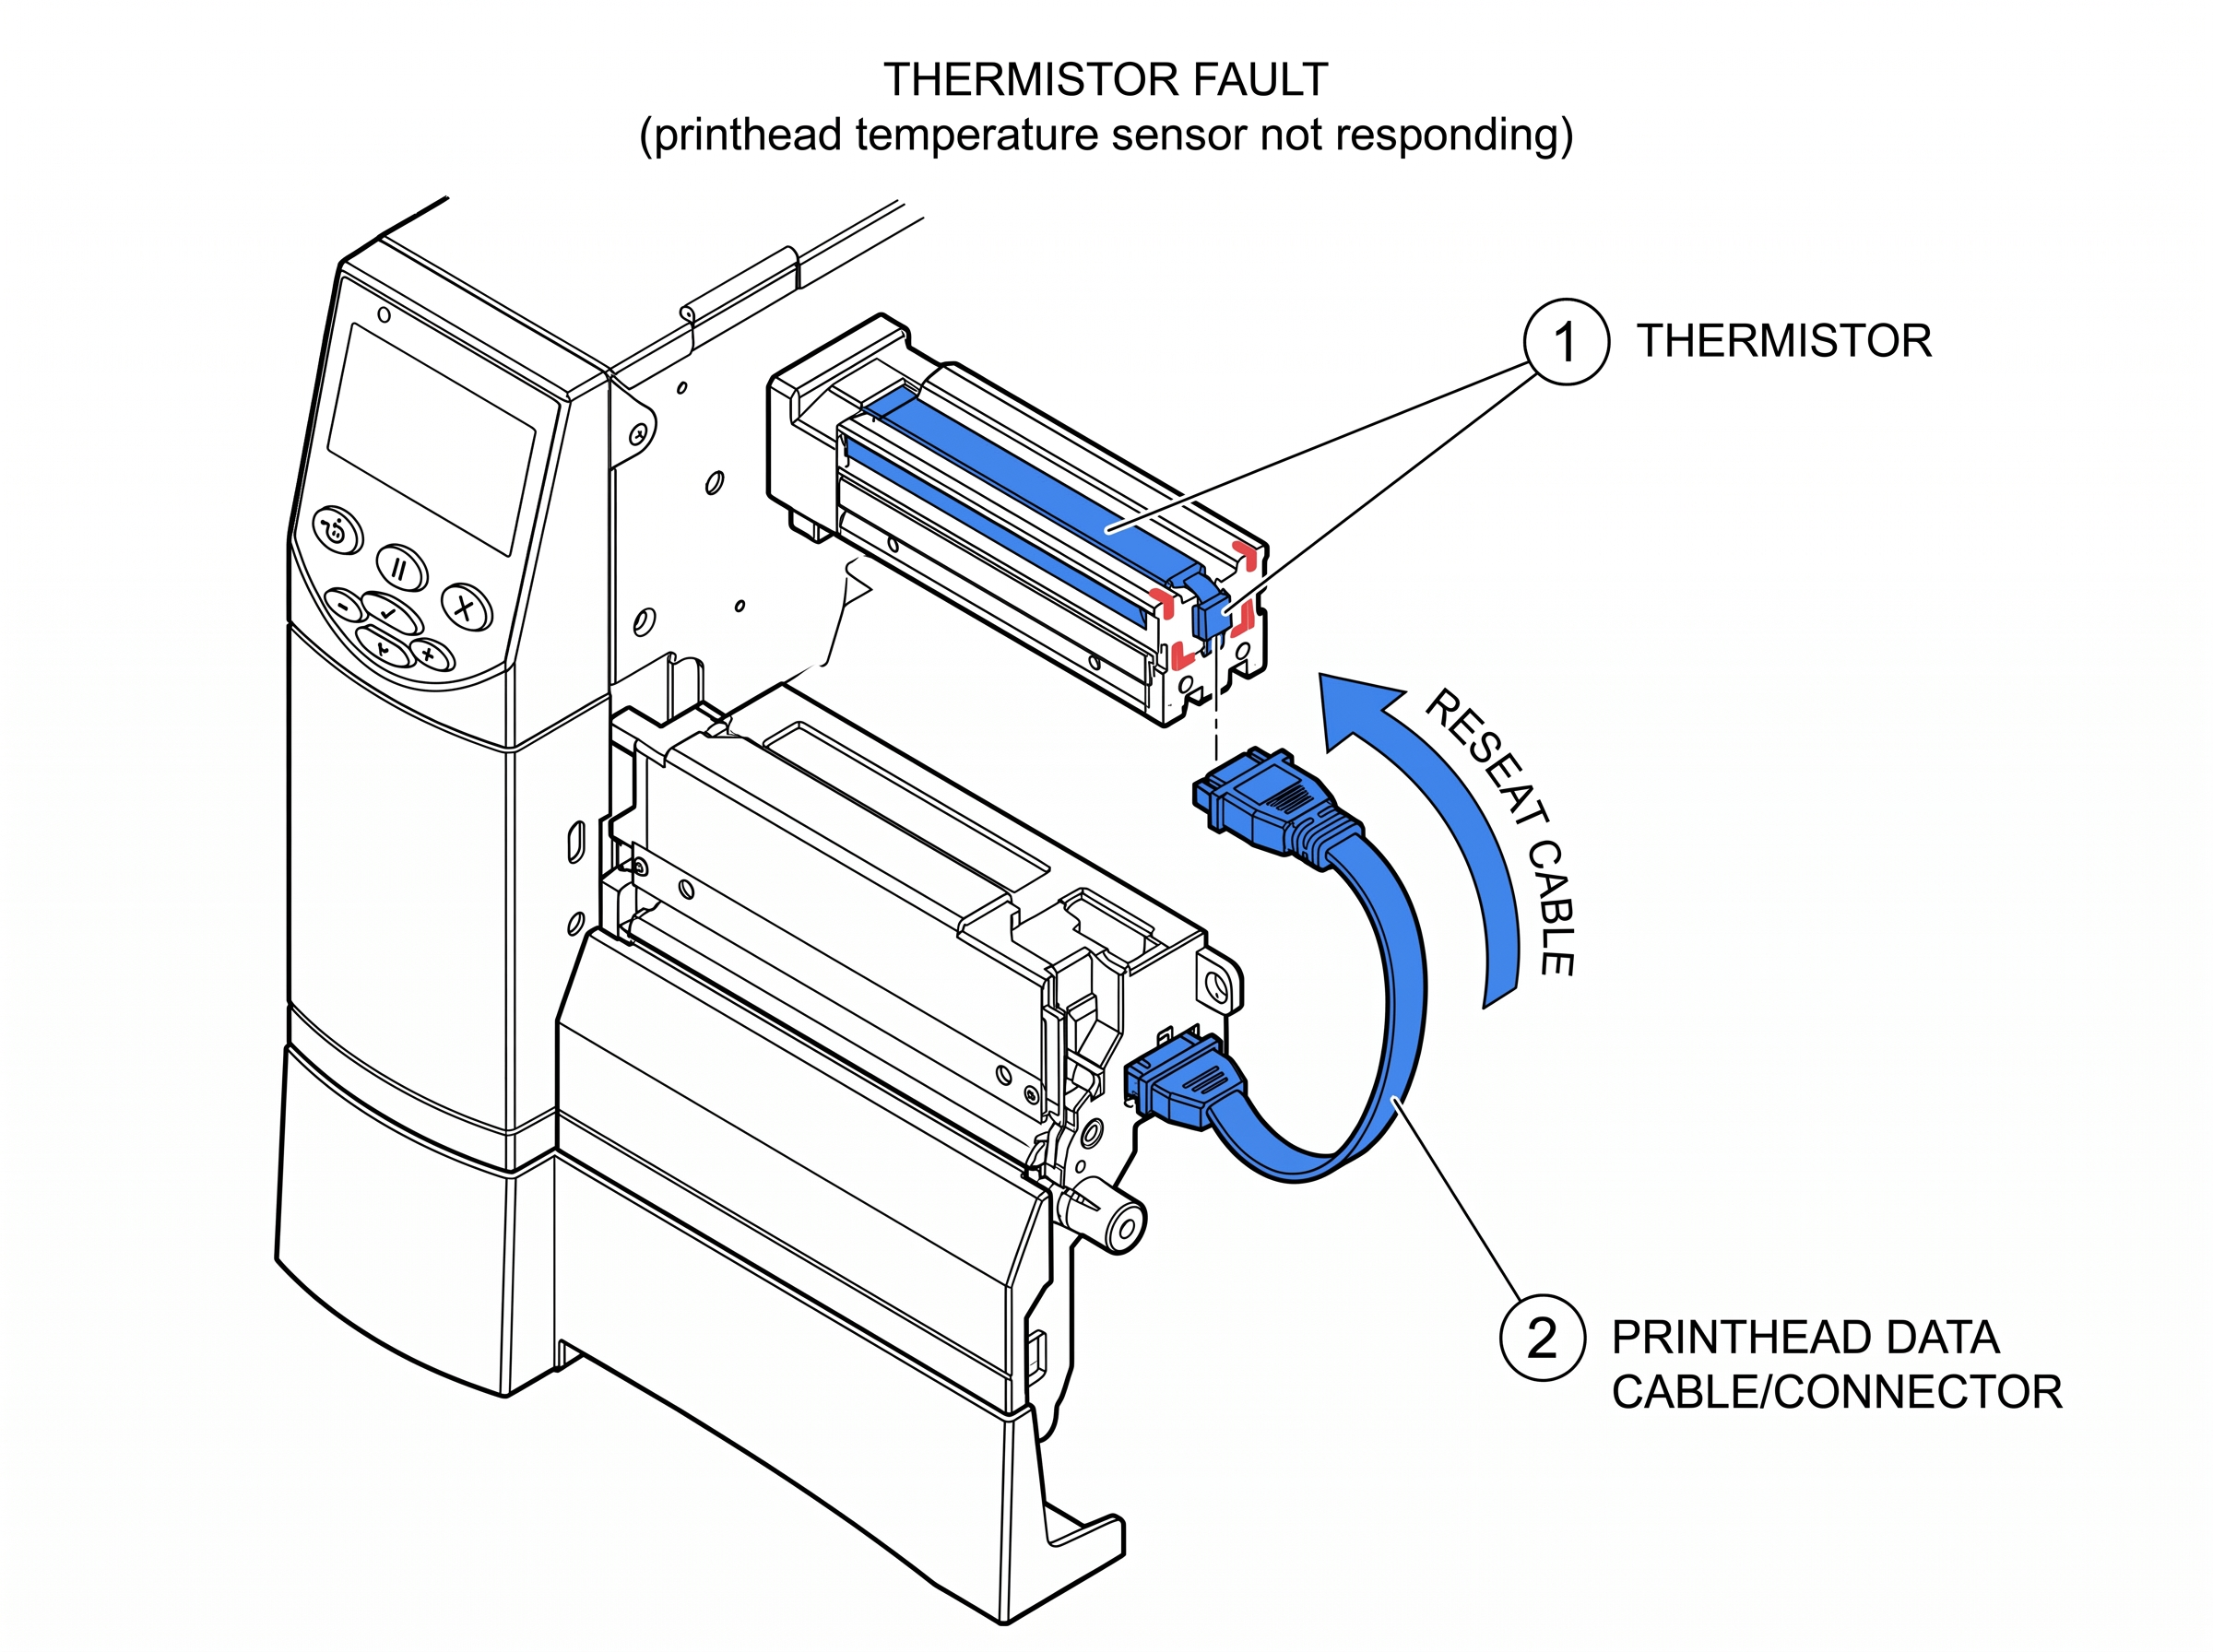 Fig 9. Thermistor Fault
The printhead temperature is below the minimum operating threshold. The ZM600's operating range starts at 40°F (4.4°C)....
View fixWhat This Error Means
The printhead temperature is below the minimum operating threshold. The ZM600's operating range starts at 40°F (4.4°C). The printer will continue printing with this warning — the ERROR light flashes but printing doesn't stop.
Common Causes
How to Fix It
- 1 Allow the printer to warm up for 10-15 minutes. The ZM600 will continue printing during this time.
- 2 If the environment is below 40°F, relocate the printer to a warmer area. The ZM600 is not rated for sub-40°F operation.
- 3 If the environment is warm but the error persists, check the printhead data cable connection (see Thermistor Fault).
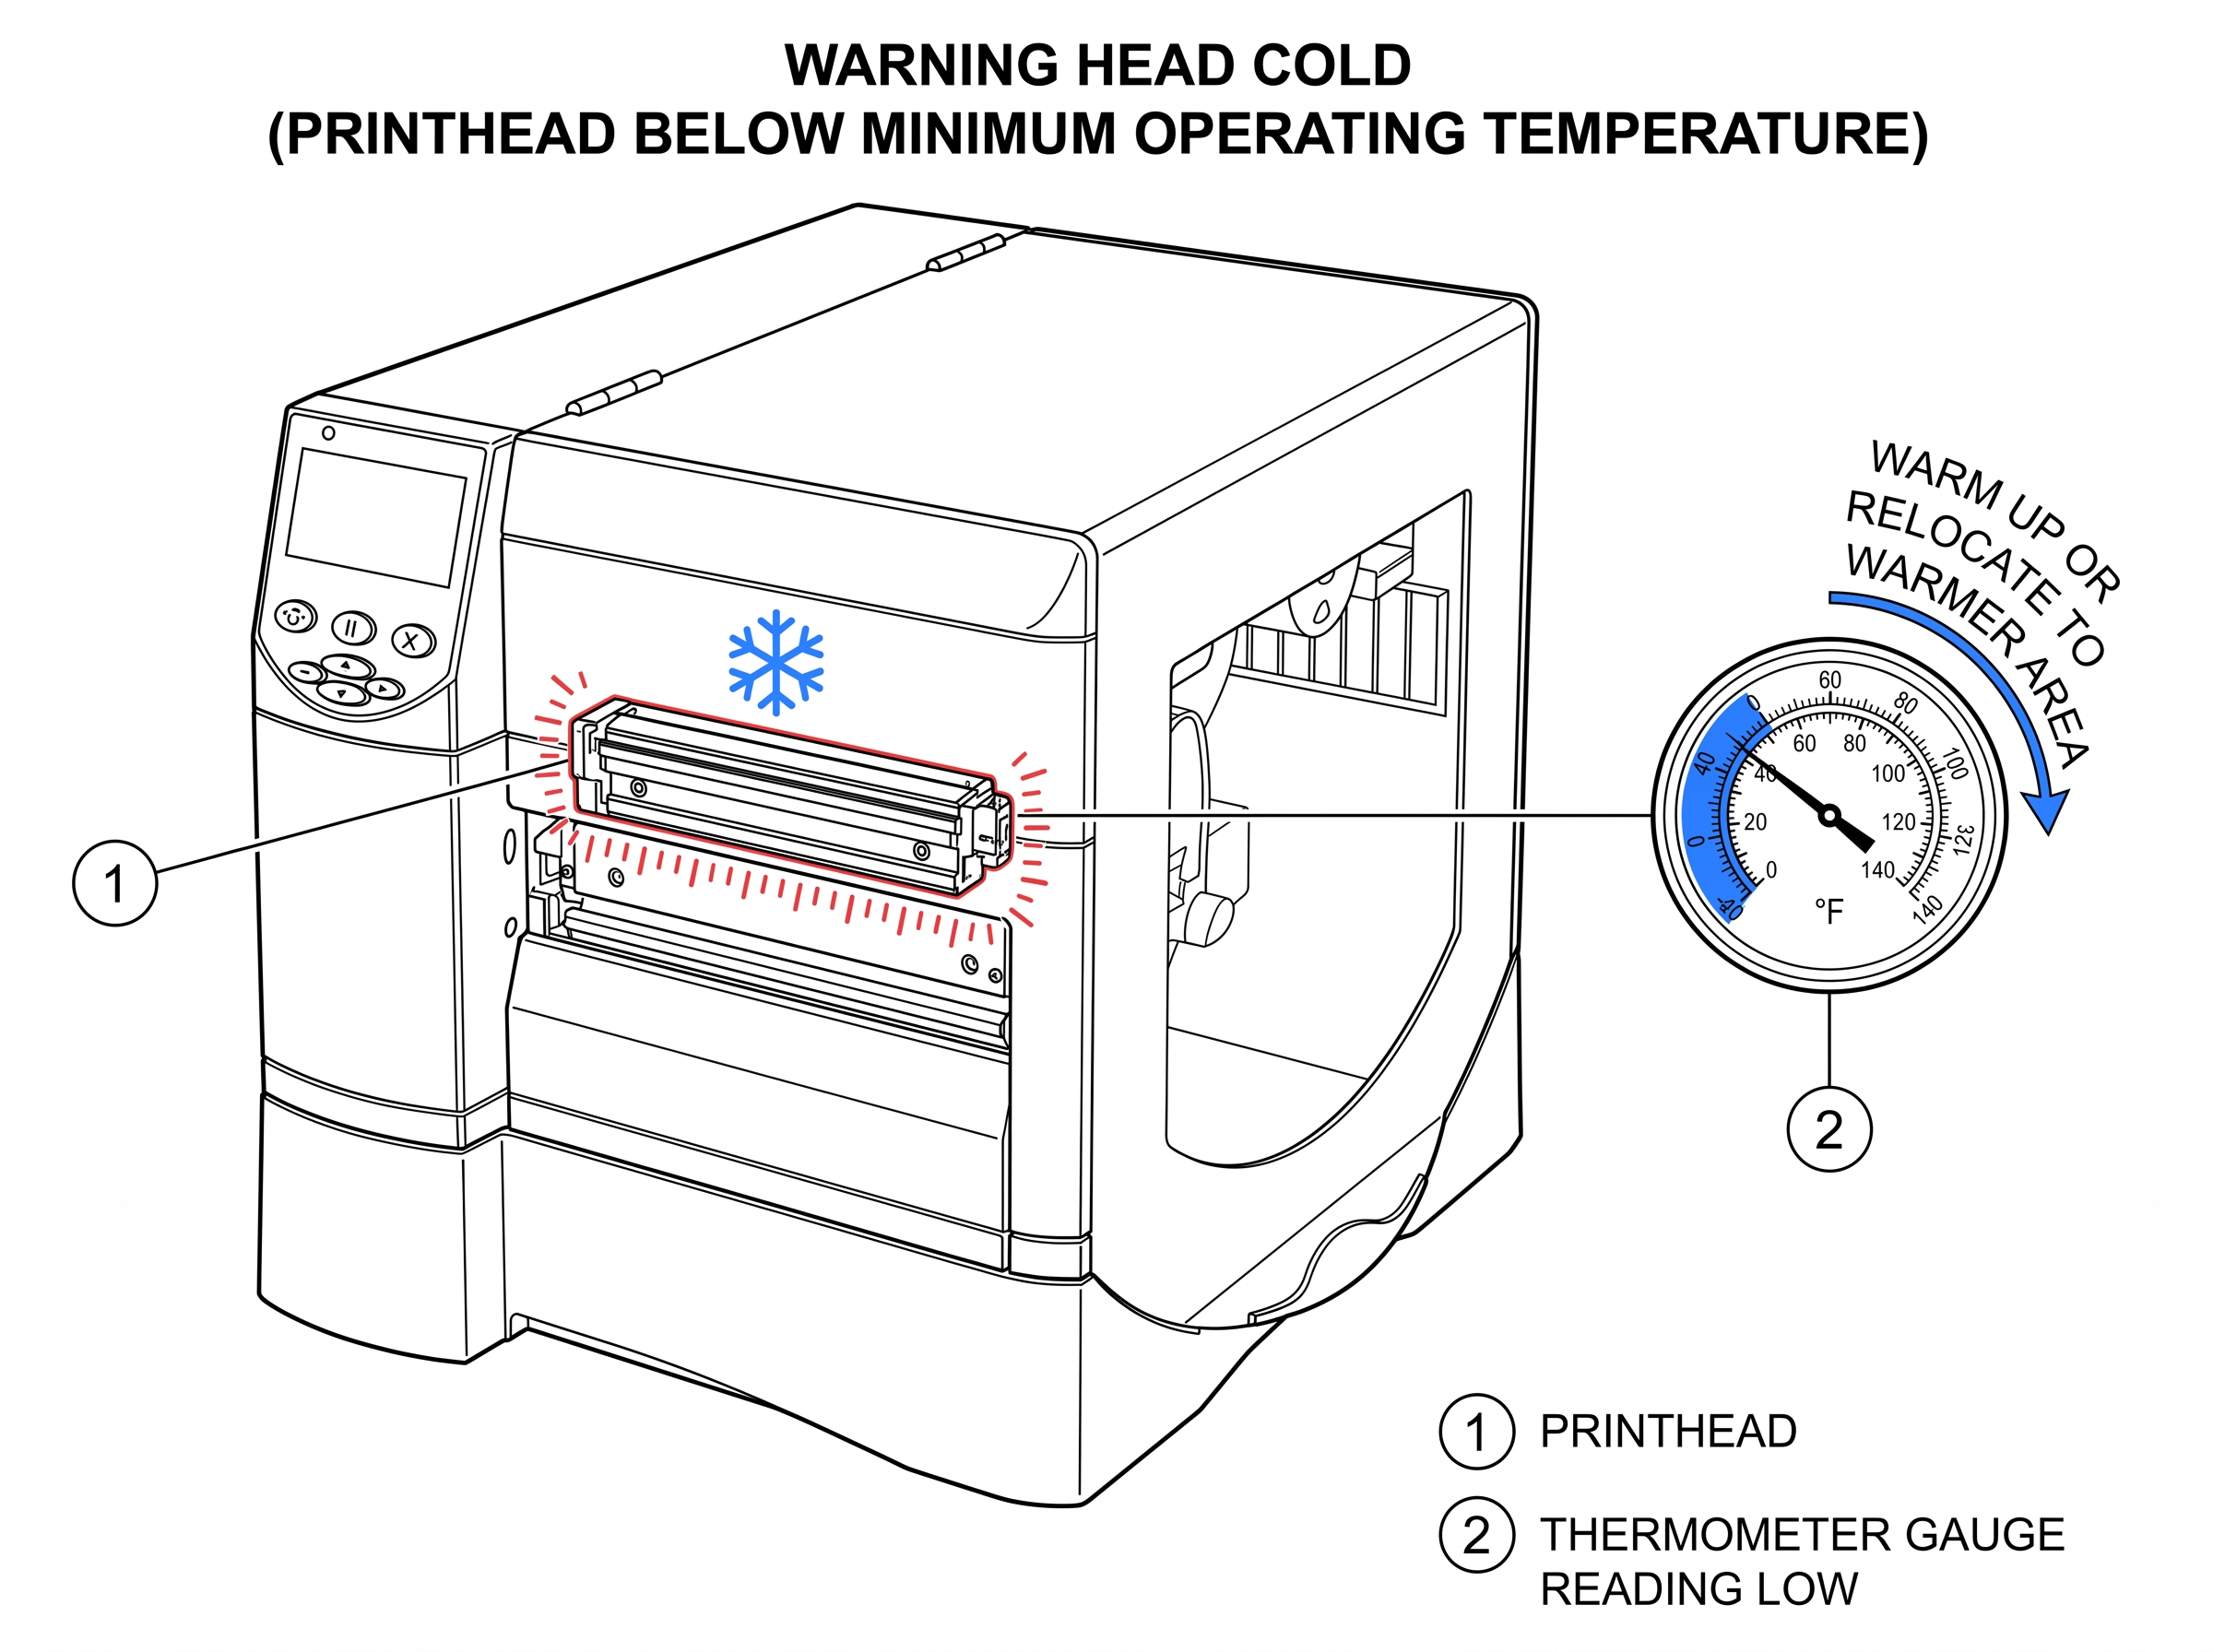 Fig 10. Head Cold
The printhead has exceeded its maximum safe operating temperature. The ZM600 will pause printing automatically to prot...
View fixWhat This Error Means
The printhead has exceeded its maximum safe operating temperature. The ZM600 will pause printing automatically to protect the printhead. The wider printhead generates more total heat than narrower models, so this can occur sooner during sustained high-speed runs.
Common Causes
- Extended high-volume print runs at maximum speed (10 in/sec at 203 dpi)
- Darkness/heat setting higher than necessary
- Inadequate ventilation around the printer
How to Fix It
- 1 Let the printer cool. It will resume printing on its own once the temperature drops.
- 2 Lower the darkness setting: SETUP > DARKNESS. Start at the lowest setting that produces an acceptable print and work up.
- 3 Reduce print speed if possible. Slower speeds generate less heat.
- 4 Ensure the printer has adequate airflow — don't enclose it in a cabinet or push it against a wall.
- 5 If this happens frequently during normal print volumes, the thermistor may need inspection.
Fig 11. Head too Hot
The printer detects ribbon installed but the print mode is set to Direct Thermal (which doesn't use ribbon). This is a ...
View fixWhat This Error Means
The printer detects ribbon installed but the print mode is set to Direct Thermal (which doesn't use ribbon). This is a mode mismatch. The ERROR light flashes, but this warning will not stop printing.
Common Causes
- Print mode set to "Direct Thermal" while ribbon is still installed
- Switched from thermal transfer labels to direct thermal labels but forgot to remove the ribbon
- ZPL command ^MTD in a label format overriding the front panel setting to direct thermal mode
How to Fix It
- 1 Decide which print mode you need: Thermal Transfer (uses ribbon) or Direct Thermal (no ribbon).
- 2 If using thermal transfer labels: go to SETUP > PRINT MODE > select THERMAL TRANSFER.
- 3 If using direct thermal labels: remove the ribbon from the printer entirely. The warning will clear.
- 4 Check your ZPL formats for ^MTD (direct thermal) or ^MTT (thermal transfer) commands that may override the panel setting.
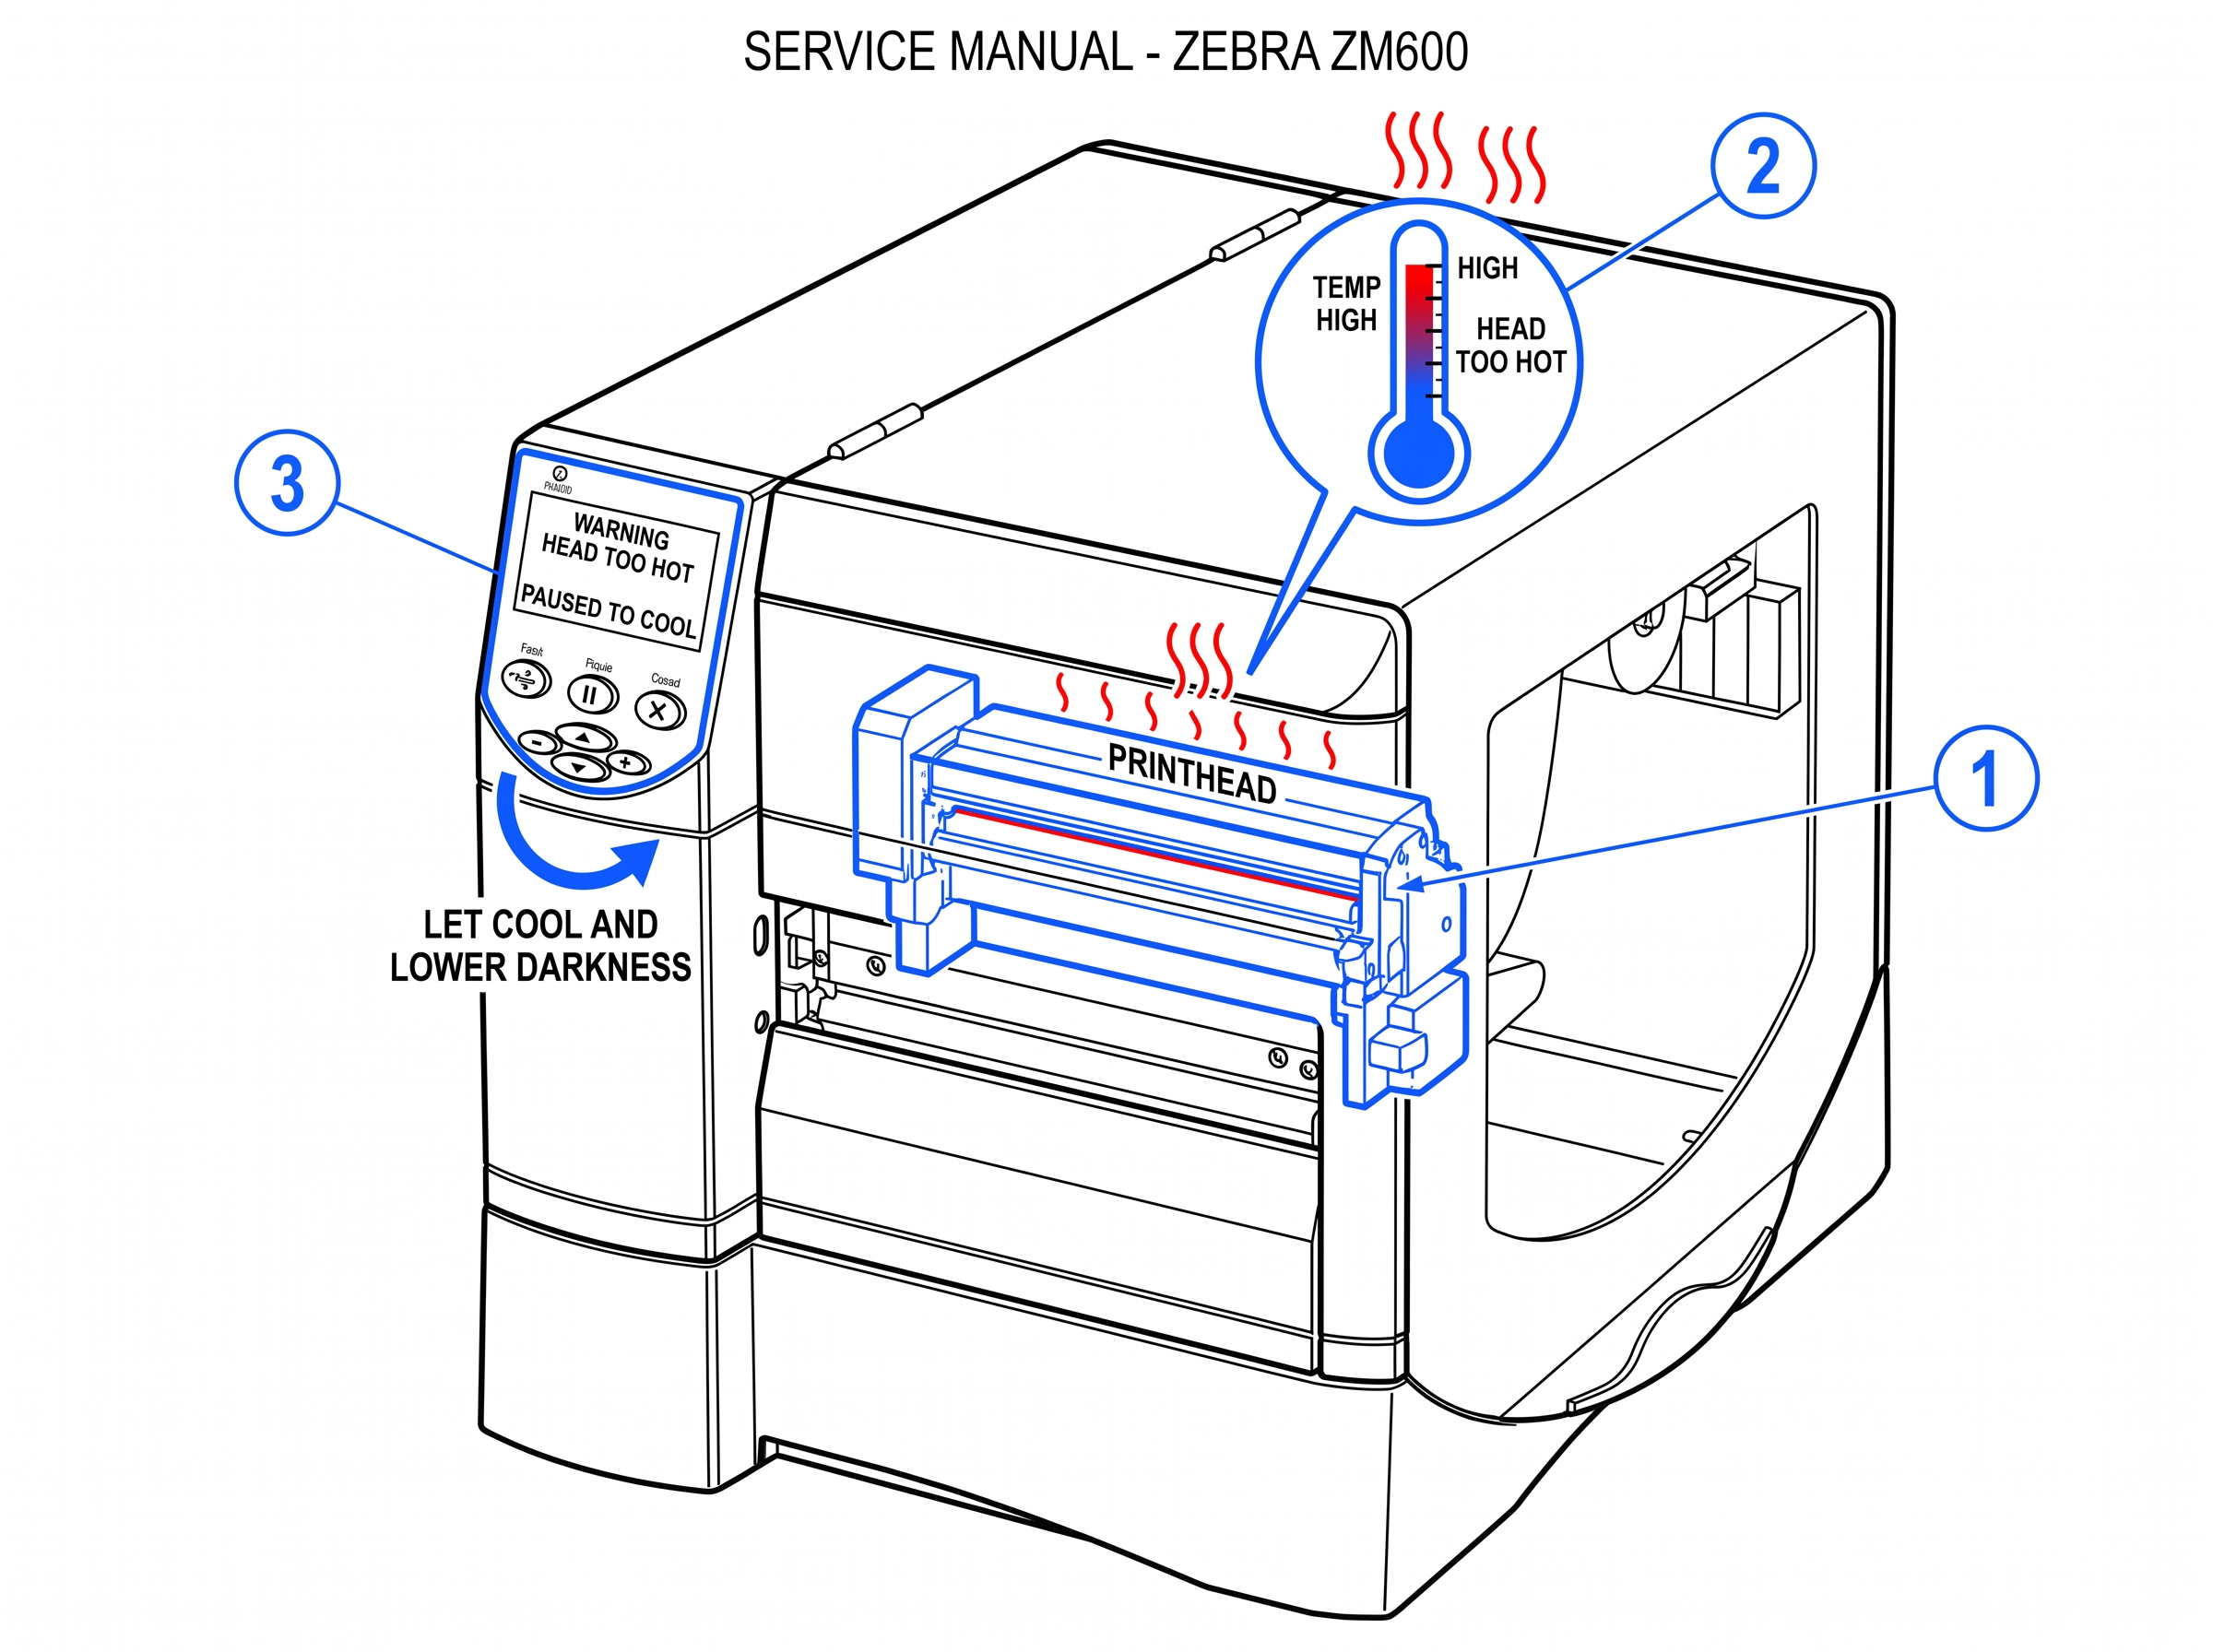 Fig 12. Ribbon In
Calibration Issues
Overview
The ZM600's auto-calibration routine detects the media type, gap/mark position, and ribbon presence. Run this any time you load a new roll of labels, change label sizes, or replace the printhead.
How to Run It
With media loaded and printhead closed, hold FEED + PAUSE simultaneously. The printer will feed 4-6 labels while calibrating.
What It Does
The printer adjusts the transmissive and reflective sensors to match your media's gap thickness, backing opacity, and label spacing.
How to Verify
After calibration, press FEED once — the printer should advance exactly one label and stop at the next gap. If it over-feeds or under-feeds, calibration failed.
ZPL Alternative
Send ~JC to trigger auto-calibration remotely.
When auto-calibration fails — common with clear labels, pre- printed media, or non-standard gap sizes — manual calibrat...
View guidePrinting a sensor profile helps diagnose persistent calibration failures. The profile shows the actual sensor readings ...
View guideRibbon & Label Issues
Overview
The ZM600 supports both print modes, and mixing them up is one of the most common causes of "Warning Ribbon In" and "Ribbon Out" errors. Thermal Transfer uses a ribbon (wax, wax-resin, or resin) to transfer ink onto the label — required for most durable labeling. Direct Thermal uses heat-sensitive label stock that darkens on contact, no ribbon needed. Check your current mode
^MTT (thermal transfer) or ^MTD (direct thermal).Incorrect ribbon loading is behind most "Ribbon Out" errors where ribbon is physically present. The ink-coated side mus...
View guideRibbon wrinkling causes vertical creases in the print image and wastes ribbon. This is more common on the ZM600 than na...
View guideWhat Our Customers Are Saying
Repair Videos
MIDCOM Data Technologies on YouTube
See real Zebra printer repairs by our certified field technicians. Printhead replacements, calibration walkthroughs, cutter module service, and preventive maintenance tips.
Visit ChannelWhen to Call MIDCOM
Get your ZM600 running today.
Certified Zebra repair, on-site, nationwide. 30-day warranty on every repair.

